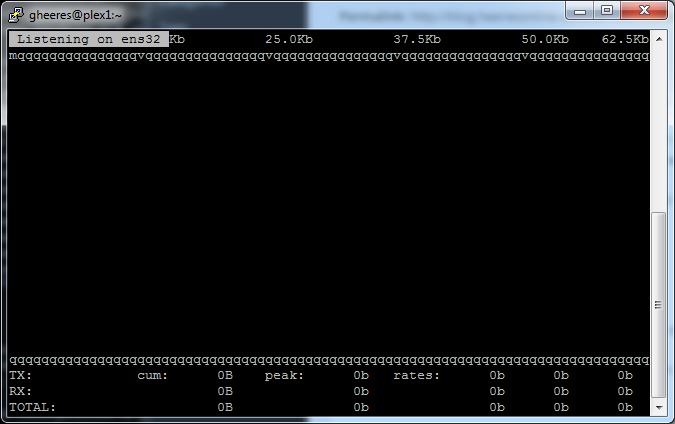
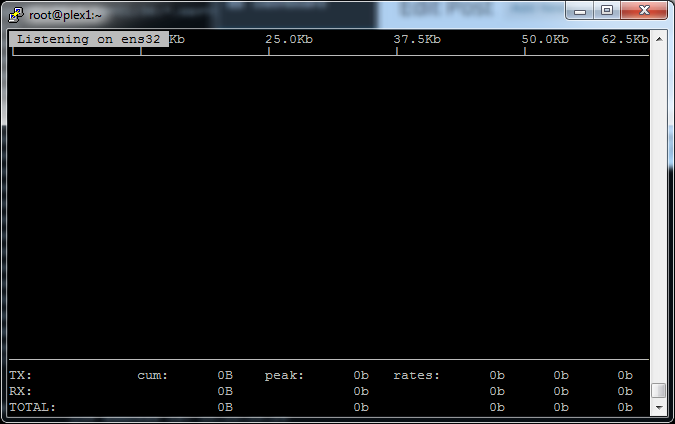
putty-centos-utf8-acs-incorrect

When using PuTTy to connect to a CentOS 6/7 host, if you use any console utility that makes use of line art (i.e. ncurses library, etc.), instead of seeing lines, you’ll see ASCII characters.

The fix is pretty simple. Add the following to the end of the /etc/bashrc file (assuming you’re using the default BASH shell).

export NCURSES_NO_UTF8_ACS=1

Once the environment variable is exported, the ASCII line art should work correctly.

putty-centos-utf8-acs-correct

Optionally, if you didn’t want this to be a permanent change, you could just enter it in your terminal window each time you open a session.

blogs.perl.org / byterock

Gentoo Linux

[blocks B] <perl-core/Digest-MD5 (“<perl-core/Digest-MD5” is blocking virtual/perl-Digest-MD5)

ARGH!!! If you managed a Gentoo machine long enough, I’m sure you’ve seen an endless list of block statements when trying to do an upgrade or just about… EVERYTHING.

But updating ‘dev-lang/perl’ in particular on a Gentoo based machine can be an experiment in premature hair loss. The following can save a couple of those hairs:

emerge -av1 perl-cleaner
emerge -av1O dev-lang/perl
perl-cleaner --all

We first make sure that the ‘perl-cleaner’ utility is installed. Then we do a single one-time installation of the new version of perl. And lastly we force all of the installed perl packages to update to the latest version.

You’ll likely end up with a bunch of packages that are no longer maintained or still conflict, in which case, you’ll need to unmerge those perl packages manually. An example of all the blocks:

[blocks B      ] <perl-core/Digest-MD5-2.530.0 ("<perl-core/Digest-MD5-2.530.0" is blocking virtual/perl-Digest-MD5-2.530.0-r2)
[blocks B      ] <perl-core/Test-Harness-3.330.0 ("<perl-core/Test-Harness-3.330.0" is blocking virtual/perl-Test-Harness-3.330.0)
[blocks B      ] <perl-core/File-Spec-3.480.100 ("<perl-core/File-Spec-3.480.100" is blocking virtual/perl-File-Spec-3.480.100-r1)
[blocks B      ] <perl-core/Compress-Raw-Zlib-2.65.0 ("<perl-core/Compress-Raw-Zlib-2.65.0" is blocking virtual/perl-Compress-Raw-Zlib-2.65.0)
...

Total: 95 packages (41 upgrades, 12 new, 42 reinstalls), Size of downloads: 839 kB
Conflict: 25 blocks (22 unsatisfied)

 * Error: The above package list contains packages which cannot be
 * installed at the same time on the same system.

  (virtual/perl-Archive-Tar-1.960.0::gentoo, ebuild scheduled for merge) pulled in by
    =virtual/perl-Archive-Tar-1.960.0 required by (perl-core/Module-Build-0.420.500::gentoo, ebuild scheduled for merge)
    virtual/perl-Archive-Tar:0
    >=virtual/perl-Archive-Tar-1.09 required by (perl-core/Module-Build-0.420.500::gentoo, ebuild scheduled for merge)

  (perl-core/Module-Load-0.240.0::gentoo, ebuild scheduled for merge) pulled in by
    perl-core/Module-Load:0

  (perl-core/Sys-Syslog-0.320.0-r1::gentoo, ebuild scheduled for merge) pulled in by
    perl-core/Sys-Syslog:0
...

You can try the following to help with the core and virtual packages:

emerge --deselect --ask $(qlist -IC 'perl-core/*')
emerge -uD1a $(qlist -IC 'virtual/perl-*')

This will remove all perl-core packages from your world file. Then it will update all the installed Perl virtuals (which will bring in all of the core files).

Does anyone even use perl anymore?

I was working on setting up a DRBD cluster to use for NFS storage for VMWare. Although I had done this numerous times on Gentoo based distributions, this was the first time I was using CentOS. Getting DRBD installed and configured was pretty simple. In this example /dev/sdb is my physical or underlying device.

DRBD

First step is to add the ELRepo repository which contains the packages for DRBD.

rpm -ivh http://elrepo.org/elrepo-release-6-5.el6.elrepo.noarch.rpm

Next do the install.

yum install -y kmod-drbd84 drbd84-utils

Now we can configure our DRBD resource.

Improving Performance

At first, the network performance was poor even after changing the network MTU to 9000. We were averaging about 40MB/s, less than 1/3 of our maximum 1Gb network performance.

version: 8.4.5 (api:1/proto:86-101)
GIT-hash: 1d360bde0e095d495786eaeb2a1ac76888e4db96 build by mockbuild@Build64R6, 2014-08-17 19:26:04

 1: cs:SyncTarget ro:Primary/Primary ds:Inconsistent/UpToDate C r-----
    ns:0 nr:45725696 dw:45724672 dr:0 al:0 bm:0 lo:2 pe:2 ua:1 ap:0 ep:1 wo:f oos:5196995292
        [>....................] sync'ed:  0.2% (5075188/5081664)M
        finish: 36:11:07 speed: 39,880 (39,224) want: 50,280 K/sec

At that speed, the initial sync was going to take 36+ hours!!! But after a little bit of tweeking to the configuration based on our underlying hardware, we achieved a 2.5x performance increase.

version: 8.4.5 (api:1/proto:86-101)
GIT-hash: 1d360bde0e095d495786eaeb2a1ac76888e4db96 build by mockbuild@Build64R6, 2014-08-17 19:26:04

 1: cs:SyncTarget ro:Primary/Primary ds:Inconsistent/UpToDate C r-----
    ns:0 nr:13627448 dw:13626368 dr:608 al:0 bm:0 lo:1 pe:0 ua:1 ap:0 ep:1 wo:d oos:5026573020
        [>....................] sync'ed:  0.3% (4908760/4922068)M
        finish: 13:36:03 speed: 102,656 (89,644) want: 102,400 K/sec
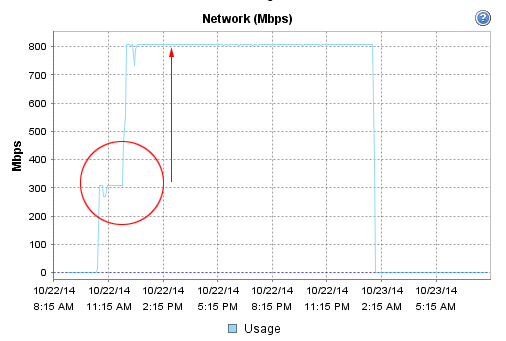
2.5x performance increase!

2.5x performance increase!

That’s MUCH better! The little blips in the graph is when I was playing around with settings. In the end, the initial sync still took 11 hours for the 5TB disk to complete.

Below is the final result of our configuration file: /etc/drbd.d/nfs-mirror.res.

resource nfs-mirror {
  startup {
    wfc-timeout 30;
    outdated-wfc-timeout 20;
    degr-wfc-timeout 30;

    become-primary-on both;
  }

  net {
    protocol C;

    allow-two-primaries;

    after-sb-0pri discard-least-changes;
    after-sb-1pri discard-secondary;
    after-sb-2pri violently-as0p;

    rr-conflict disconnect;

    max-buffers 8000;
    max-epoch-size 8000;
    sndbuf-size 512k;
  }

  disk {
    al-extents 3389;

    disk-barrier no;
    disk-flushes no;
  }

  syncer {
    rate 100M;
    verify-alg sha1;
  }

  on host1 {
    device minor 1;
    disk /dev/sdb;
    address 192.168.55.1:7789;
    meta-disk internal;
  }

  on host2 {
    device minor 1;
    disk /dev/sdb;
    address 192.168.55.2:7789;
    meta-disk internal;
  }
}

Now that we had DRBD configured it was time to setup our NFS servers.

Creating our LVM Volumes

And that’s when the fun began…

Instead of having to deal with the complexities of a clustered file system (i.e. OCFS2,GFS) that would allow a true primary/primary mode, we decided to split the storage in half and each ESXi host would have one of the volumes mounted. In the event of a problem with one of the NFS servers, the remaining NFS server could take over the duties of the other NFS server since it had a real-time up-to-date copy of the other NFS partition containing our VMs. This post doesn’t cover the automatic fail-over of those resources.

Note: A previously built cluster which used LXC containers ran an OCFS2 filesystem on top of DRBD. At first glance, OCFS2 ran wonderfully, but then we started having weird problems with out of space errors even though there was plenty of inodes and actual space free. In short, with OCFS2, you need to make sure the applications you intend to run on OCFS2 are “cluster-aware” and use the proper API calls for kernel locks, writes, etc.

Setting up LVM with an underlying XFS filesystem was pretty simple. We’re going to use LVM on top of DRBD. Optionally, you can use DRBD on top of LVM.

pvcreate /dev/drbd/by-res/nfs-mirror

vgcreate nfs /dev/drbd/by-res/nfs-mirror

lvcreate -l 639980 --name 1 nfs
lvcreate -l 639980 --name 2 nfs

mkfs.xfs /dev/nfs/1
mkfs.xfs /dev/nfs/2

So far so good. After a quick reboot, we check our drbd status and find the following.

version: 8.4.5 (api:1/proto:86-101)
GIT-hash: 1d360bde0e095d495786eaeb2a1ac76888e4db96 build by mockbuild@Build64R6, 2014-08-17 19:26:04

 1: cs:Connected ro:Secondary/Secondary ds:Diskless/Diskless C r-----
    ns:0 nr:0 dw:0 dr:0 al:0 bm:0 lo:0 pe:0 ua:0 ap:0 ep:1 wo:b oos:0

Uh oh! It’s showing that the disk isn’t found. But I can see the LVM disk recognized and available. Attempting to force one of the nodes to become primary results in the following dmesg error.

block drbd1: State change failed: Need access to UpToDate data
block drbd1:   state = { cs:Connected ro:Secondary/Secondary ds:Diskless/Diskless r----- }
block drbd1:  wanted = { cs:Connected ro:Primary/Secondary ds:Diskless/Diskless r----- }

I remember having problems with LVM and DRBD so I quickly do a google search and find the Nested LVM configuration with DRBD. So we make the following change to the filter setting in our /etc/lvm/lvm.conf file.

filter = [ "a|sd.*|", "a|drbd.*|", "r|.*|" ]

The above is basically a regular expression that LVM uses to know what block devices to search through looking for file systems. Essentially it says to accept (a) all sd* (sda, sdb, sdc, etc.) devices as well as any drbd (drbd0, drbd1, etc.) device and then to ignore (r) everything else.

Another reboot and the problem persists. With no data on the devices, I decided to wipe the LVM configuration information.

dd if=/dev/zero of=/dev/drbd1 bs=1M count=1000

And then reboot.

CentOS: LVM & DRBD Incompatibility

Suddenly on reboot, I again see the filesystem doing a sync. DRBD is working again and shows the disk online.

version: 8.4.5 (api:1/proto:86-101)
GIT-hash: 1d360bde0e095d495786eaeb2a1ac76888e4db96 build by mockbuild@Build64R6, 2014-08-17 19:26:04

 1: cs:SyncTarget ro:Primary/Primary ds:Inconsistent/UpToDate C r-----
    ns:0 nr:2197564 dw:2196480 dr:604 al:0 bm:0 lo:2 pe:6 ua:1 ap:0 ep:1 wo:d oos:395996
        [===============>....] sync'ed: 84.9% (395996/2592476)K
        finish: 0:00:06 speed: 64,512 (62,756) want: 71,200 K/sec

OK. It’s working again! LVM must be incomptible with DRBD on CentOS?

No. Lets step back and think this through. We know that LVM scans the block devices looking for configured LVM filesystems to initialize. It scans our underlying DRBD device (/dev/sdb) and sees LVM partitions so it maps then. Then DRBD comes along and attempts to grab a handle to the underlying device only to find that someone else (LVM) was already there… Hence, the disk is unavailable since LVM has it locked.

That makes logical sense. Let’s see if our theory is correct:

[root@host ~]# ls /etc/rc.d/rc3.d/ -la
total 8
lrwxrwxrwx.  1 root root   22 Oct 21 12:47 S02lvm2-monitor -> ../init.d/lvm2-monitor
lrwxrwxrwx   1 root root   14 Oct 22 10:35 S70drbd -> ../init.d/drbd

Yes. LVM (021) scans and monitors before DRBD is initialized (70). So how do we fix it…

The Solution

One solution would be to start DRBD before the LVM file system is initialized, but that could cause other timing issues. And more specifically, a “yum update” could override our configuration. Instead, how about we go back into our /etc/lvm/lvm.conf file and see if we can fix the filter parameter.

Because our underlying drbd block device is /dev/sdb, how about if we explicitly exclude it from the list? The filter parameter works such that the first matching regular expression is the action (accept or reject). Once matched for a block device, the remaining parameters are ignored. So the correct filter would be:

filter = [ "r|sdb|", "a|sd.*|", "a|drbd.*|", "r|.*|"]

Essentially, the above filter explicitly excludes DRBD’s underlying block device (/dev/sdb), then looks for any SCSI hard disks, following by DRBD devices and then excludes everything else.

After a reboot of the nodes, and everything stays update and active.

SUCCESS! Now off to finish setting up the NFS storage space…

Good luck and hopefully this helped you solve a diskless/diskless DRBD problem that wasn’t due to network connectivity problems (or an actual failed disk).

Oracle / Sun License Agreement

Oracle / Sun License Agreement

Many Linux distributions do not include an easy RPM installation of the office Sun/Oracle Java JDK/JRE requiring users to manually download the rpm from Oracle. Unfortunately, before you download, Oracle requires you to accept their Oracle Binary Code License Agreement for Java SE. Therein presents the problem.

Because most of my Linux servers do not have a X-Windows environment installed, I’m forced to use command line tools: curl or wget. A few text based browsers exist (Lynx, Links), but these are typically not installed by default and often come with their own additional dependencies. I prefer to keep my servers running as minimal as possible. “Less is more…”. In the past, I’ve accepted the license and downloaded via the client and then used SCP to transfer the file. Not ideal… but it works. But let’s see if we can do better.

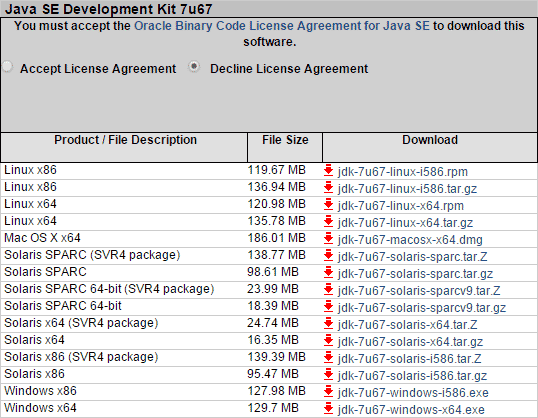
So we browse to the page on our client workstation with our browser, accept the agreement and notice that the urls for the downloads change: http://download.oracle.com/otn-pub/java/jdk/7u67-b01/jdk-7u67-linux-x64.tar.gz.

PERFECT! Let’s download that:

[user@server ~]# wget http://download.oracle.com/otn-pub/java/jdk/7u67-b01/jdk-7u67-linux-x64.rpm
--2014-10-14 11:01:45--  http://download.oracle.com/otn-pub/java/jdk/7u67-b01/jdk-7u67-linux-x64.rpm
Resolving download.oracle.com... 205.213.110.138, 205.213.110.139
Connecting to download.oracle.com|205.213.110.138|:80... connected.
HTTP request sent, awaiting response... 302 Moved Temporarily
Location: https://edelivery.oracle.com/otn-pub/java/jdk/7u67-b01/jdk-7u67-linux-x64.rpm [following]
--2014-10-14 11:01:45--  https://edelivery.oracle.com/otn-pub/java/jdk/7u67-b01/jdk-7u67-linux-x64.rpm
Resolving edelivery.oracle.com... 172.226.99.109
Connecting to edelivery.oracle.com|172.226.99.109|:443... connected.
HTTP request sent, awaiting response... 302 Moved Temporarily
Location: http://download.oracle.com/errors/download-fail-1505220.html [following]
--2014-10-14 11:01:45--  http://download.oracle.com/errors/download-fail-1505220.html
Connecting to download.oracle.com|205.213.110.138|:80... connected.
HTTP request sent, awaiting response... 200 OK
Length: 5307 (5.2K) [text/html]
Saving to: jdk-7u67-linux-x64.rpm

100%[==========================================================================================>] 5,307       --.-K/s   in 0s

2014-10-14 11:01:45 (218 MB/s) - jdk-7u67-linux-x64.rpm

It looks like it worked… but if you look closer, you’ll notice that our 100+ MB file is only about 5K in size:

[root@nexus1 t]# ls -la
total 16
drwxr-xr-x. 2 root root 4096 Oct 14 11:01 .
dr-xr-x---. 5 root root 4096 Oct 14 11:01 ..
-rw-r--r--. 1 root root 5307 Mar 20  2012 jdk-7u67-linux-x64.rpm

Viewing the contents of the file, we downloaded an HTML file that includes the following message:

In order to download products from Oracle Technology Network you must agree to the OTN license terms..

*SIGH*. Nothing is ever easy…

Let’s look at the HTML/javascript for that download page and see if we can figure out how it’s working, perhaps reverse engineer it? The interesting piece of code is when the Accept License Agreement button is clicked.

<form name="agreementFormjdk-7u67-oth-JPR" method="post" action="radio" class="lic_form">
  <input type="radio" value="on" name="agreementjdk-7u67-oth-JPR" onclick="acceptAgreement(window.self, 'jdk-7u67-oth-JPR');"> &nbsp;Accept License Agreement&nbsp;&nbsp;&nbsp; 
  <input type="radio" value="on" name="agreementjdk-7u67-oth-JPR" onclick="declineAgreement(window.self, 'jdk-7u67-oth-JPR');" checked="checked"> &nbsp; Decline License Agreement
</form>

A call is made to the acceptAgreement function.

As we wade through the page, which horribly pollutes the global namespace and doesn’t follow any javascript best practices, we come across our function:

// Dynamically generated download page for OTN. 
// Aurelio Garcia-Ribeyro, 2012-05-21, based off of pre-existing code for OTN license acceptance
function acceptAgreement(windowRef, part){
	var doc = windowRef.document;
	disableDownloadAnchors(doc, false, part);
	hideAgreementDiv(doc, part);
	writeSessionCookie( 'oraclelicense', 'accept-securebackup-cookie' );
}

So basically, the download links are using a handler that looks for a cookie called ‘oraclelicense’. That we can work with. We basically need to send that cookie header with our command line request.

Lets try it using wget:

[user@server ~]# wget --header='Cookie: oraclelicense=accept-securebackup-cookie' http://download.oracle.com/otn-pub/java/jdk/7u67-b01/jdk-7u67-linux-x64.rpm
--2014-10-14 11:12:39--  http://download.oracle.com/otn-pub/java/jdk/7u67-b01/jdk-7u67-linux-x64.rpm
Resolving download.oracle.com... 205.213.110.138, 205.213.110.139
Connecting to download.oracle.com|205.213.110.138|:80... connected.
HTTP request sent, awaiting response... 302 Moved Temporarily
Location: https://edelivery.oracle.com/otn-pub/java/jdk/7u67-b01/jdk-7u67-linux-x64.rpm [following]
--2014-10-14 11:12:39--  https://edelivery.oracle.com/otn-pub/java/jdk/7u67-b01/jdk-7u67-linux-x64.rpm
Resolving edelivery.oracle.com... 172.226.99.109
Connecting to edelivery.oracle.com|172.226.99.109|:443... connected.
HTTP request sent, awaiting response... 302 Moved Temporarily
Location: http://download.oracle.com/otn-pub/java/jdk/7u67-b01/jdk-7u67-linux-x64.rpm?AuthParam=1413303279_659b15372dcaf37e8073becb5f049d60 [following]
--2014-10-14 11:12:39--  http://download.oracle.com/otn-pub/java/jdk/7u67-b01/jdk-7u67-linux-x64.rpm?AuthParam=1413303279_659b15372dcaf37e8073becb5f049d60
Reusing existing connection to download.oracle.com:80.
HTTP request sent, awaiting response... 200 OK
Length: 126857158 (121M) [application/x-redhat-package-manager]
Saving to: jdk-7u67-linux-x64.rpm

100%[==========================================================================================>] 126,857,158 28.1M/s   in 4.4s

2014-10-14 11:12:44 (27.5 MB/s) - jdk-7u67-linux-x64.rpm

SUCCESS!!! We now have the real files, but you could do an MD5 check to verify the contents (if an MD5 file was published…).

For quick reference, the command to set the cookie for the GET operation is:

wget --header='Cookie: oraclelicense=accept-securebackup-cookie' <download url>

When setting up a new database connection for a web front end or other connection, I will use the command line to generate a random password. Since these are machine read and used passwords, there is no excuse to use a short password.

The following are my two preferred ways to generate a random password from the BASH shell. Please note that these generators will filter out some the less desirable characters like ‘, “, etc. which can often cause problems with configuration files:

< /dev/urandom tr -dc _A-Z-a-z-0-9 | head -c${1:-32}; echo;

The echo at the end just pushes the shell prompt to the next line. You can change the -32 to whatever length you want.

Optionally, you can use SHA to hash the date and base64 encode it.

date +%s | sha256sum | base64 | head -c 32 ; echo

For more ideas and ways to generate random passwords, visit the following site: 10 Ways to Generate a Random Password from the Command Line.

ntop_logo The NTOP faq contains snippets of code about how to proxy the NTOP http server through Apache for improved security. However, with new updates to the program the image iFrames are incorrectly posting the following javascript:

<script type="test/javascript">
/ntop//ntop/<![CDATA[
...
/ntop//ntop/]]>
</script>

The correct output should be:

<script type="test/javascript">
//<![CDATA[
...
//]]>
</script>

Using the mod_proxy_html module we can modify the pages using the following:

ProxyHTMLURLMap  /ntop//ntop/      //

The full NTOP proxy configuration is as follows:

<IfModule mod_proxy_http.c>
        ProxyHTMLLogVerbose On
        LogLevel warn
        ProxyHTMLExtended On

        ProxyRequests Off
        <Proxy *>
                Order deny,allow
                Allow from all
        </Proxy>

        ProxyPass /ntop/  http://localhost:3000/
        ProxyPassReverse /ntop/  http://localhost:3000/

        <Location /ntop/>
                SetOutputFilter  proxy-html
                ProxyHTMLURLMap  /      /ntop/
                ProxyHTMLURLMap  /ntop//ntop/      //
                ProxyHTMLURLMap /ntop/plugins/ntop/ /ntop/plugins/
                RequestHeader    unset  Accept-Encoding
        </Location>
</IfModule>