With a continuous integration and release pipeline configured and working, I was going back through projects and creating the necessary build and release tasks. One build job however was failing with the following error:

2016-03-04T13:04:26.3021168Z Set workingFolder to default: D:\TFS\tasks\NuGetInstaller\0.1.16
2016-03-04T13:04:26.3391205Z Executing the powershell script: D:\TFS\tasks\NuGetInstaller\0.1.16\NuGetInstaller.ps1
2016-03-04T13:04:26.6061472Z D:\TFS\agent\worker\tools\NuGet.exe restore "d:\TFS\_work\1\s\src\MySolution.sln"  -NonInteractive
2016-03-04T13:04:26.9761842Z MSBuild auto-detection: using msbuild version '14.0' from 'C:\Program Files (x86)\MSBuild\14.0\bin'.
2016-03-04T13:04:27.0951961Z ##[error]There are duplicate packages: log4net.1.2.10
2016-03-04T13:04:27.1041970Z ##[error]Unexpected exit code 1 returned from tool NuGet.exe

The error causing the job to fail is:

There are duplicate packages

Checking The Build

So I checked out the project and compiled with Visual Studio, no problems. Then I tried using the nuget command from the command line.

D:\Projects\MySolution\src>nuget restore
ll packages listed in packages.config are already installed.

The packages folder already exists so we have to clear it first. Since I have Cygwin installed (and I prefer the Unix tools), I just deleted the folder from the command line:

rm -rf Packages

You can obviously do this from the Windows explorer shell or use the native DOS commands.

So running the command again, all of the packages restore without issue. Hmmm…

Replicating The Error

So next, I run the identical command that was logged in the log output for the build job:

D:\TFS\_work\1\s\src>D:\TFS\agent\worker\tools\NuGet.exe restore "d:\TFS\_work\1\s\src\MySolution.sln"  -NonInteractive
MSBuild auto-detection: using msbuild version '12.0' from 'C:\Program Files (x86)\MSBuild\12.0\bin'.
There are duplicate packages: log4net.1.2.10

And now we finally get the error to duplicate.

But why?

Let’s check the versions of our NuGet utility.

On the build server, we have:

D:\TFS\_work\1\s\src>D:\TFS\agent\worker\tools\NuGet.exe
nuget Version: 3.2.1.10581

On the workstation with Visual Studio (with NuGet specified in the path), we have:

D:\Projects\MySolution\src>nuget
NuGet Version: 2.8.50926.602

Different NuGet Versions

So the build server is using the 3.x branch of NuGet which doesn’t handle XML errors as gracefully (or is more strict) as the prior version. So now we know the cause of the problem, let see if we can find the duplicate.

And sure enough, inside of a subproject we have the following inside of the packages.config file:

  <package id="log4net" version="1.2.10" targetFramework="net45" />
  <package id="log4net" version="1.2.10" targetFramework="net45" />

Remove the dupliate line, recommit and push the code.

Problem SOLVED!

For my employer, I’ve been working on setting up a continuous integration and release pipeline using Team Foundation Server (TFS) on-premise. Earlier this year, I had started experimenting with the standalone Release Management 2015 tool. Although I made some progress, the XAML based workflows and client tooling left a lot to be desired and I ended up reverting to using msbuild deployment options directly from the build itself. Not ideal, but better than nothing.

I was ecstatic to learn that a web-based version of Release Management had been integrated into Visual Studio Team Services (VSTS), formerly Visual Studio Online, as part of a preview release. But much to my dismay, the new Release Management (in preview), wasn’t scheduled to be available for on-premise TFS until later in 2016. VSTS typically get’s new updates every three weeks, with those updates rolled to TFS on-premise on a quarterly cycle. It was clear that the Release Management 2015 client and server tool were going away so it didn’t pay time to continue exploring the solution.

An Early Birthday Present!

After resigning myself to the fact that I’d have to wait to get my hands on the new Release Management tools, the release candidate for TFS 2015 Update 2 was announced. Much to my surprise and excitement TFS 2015 Update 2 RC1 included the new web-based version of Release Management.

Although I typically avoid release candidates, this couldn’t wait…

Dude, Where’s My IIS Deployment?

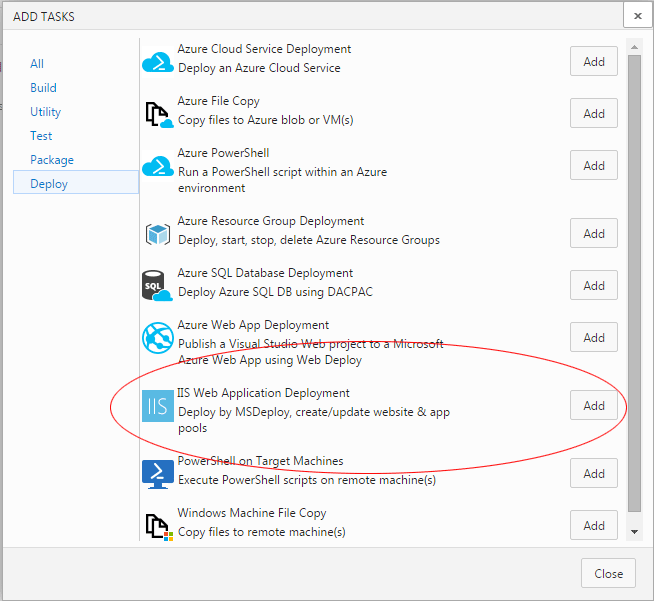
Missing IIS Web Application Deployment TaskWith the new bits installed on the server, I finally had access to the new web-based Release Management UI and could start following along with some of the online tutorials I was seeing for VSTS. In one of those tutorials, I saw reference to an “IIS Web Application Deployment” task. Just the task I needed to deploy my application to IIS! Unfortunately, this task wasn’t available on my on-premise installation?

After a little bit of searching, I found the open source vso-agent-task Github repo for all of the tasks included in VSTS:

Included in that repo is the IISWebAppDeployment task which is missing for my installation. I assumed that the IISWebAppDeployment task wasn’t available simply because it hadn’t been included in the TFS 2015 Update 2 RC1 release. Should be simple enough to fix…

Use The Source

With the source in hand, the next step was figuring out how to get it deployed. I found an article that discussed how to deploy custom tasks… not a task for the faint of heart. As I prepared myself for the task, I learned that since that post was originally made, Microsoft had released the TFS Cross Platform Command Line Interface which not only simplifies the process but is the supported and recommended method for installing extensions.

TFS Cross Platform Command Line Interface

Insallation

Installation of the tool is easy with node.js and npm.

npm -g install tfx-cli

Getting Authenticated

The first step is to get logged into the TFS server. By default, the logon process is going to look for a VSTS personal authentication code which doesn’t apply (yet) to TFS on-premise. Thankfully basic authentication is supported, but you’ll need to enable it on your TFS server. While you’re enabling basic authentication, I strongly encourage you to configure your TFS / IIS server to force SSL. Sending a basic username and password without an encrypted connection is ALWAYS a bad idea.

Run the following command to interactively login:

C:\Users\gheeres\vso-agent-tasks>tfx login --auth-type basic
TFS Cross Platform Command Line Interface v0.3.15
Copyright Microsoft Corporation
> Service URL: https://tfs.heeresonline.com/MyCollection
> Username: tfs-admin@heeresonline.com
> Password:
Logged in successfully

One logged in, you can run additional commands to view the list of installed tasks.

C:\Users\gheeres\vso-agent-tasks>tfx build tasks list
TFS Cross Platform Command Line Interface v0.3.15
Copyright Microsoft Corporation

id            : 7c6a6b71-4355-4afc-a274-480eab5678e9
name          : DecryptFile
friendly name : Decrypt File (OpenSSL)
visibility    : Build,Release
description   : A thin utility task for file decryption using OpenSSL.
version       : 1.0.5

...

If I recall, when I grep‘ed the output for the IISWebAppDeployment task nothing was found. This should be easy. Let get that deployed.

C:\Users\gheeres\vso-agent-tasks>tfx build tasks upload --task-path Tasks\IISWebAppDeployment
TFS Cross Platform Command Line Interface v0.3.15
Copyright Microsoft Corporation
Error: Failed Request: Conflict(409) - A task definition with id 89a3a82d-4b3e-4a09-8d40-a793849dc94f and version 1.0.9 has already
been uploaded. To replace the existing definition, re-register the task definition before uploading the package.

$&!#? Already Been Uploaded? Seriously?

The error tells us that the task, has already been uploaded. But when we search our Task list in the build and release UIs, the “IIS Web Application Deployment” task is still not seen. Hmmm…

If we look at the task.json file, we notice a “visibility” attribute with the value of “Preview”.

  "visibility": [
    "Preview",
    "Build",
    "Release"
  ]

Although I couldn’t find documentation, this “Preview” tag must prevent the UI for seeing the task. So lets get that changed. Edit the Tasks/IISWebAppDeployment/task.json file to remove the “Preview” option, or apply the following patch.

diff --git a/Tasks/IISWebAppDeployment/task.json b/Tasks/IISWebAppDeployment/task.json
index fc1d9b4..2bd1535 100644
--- a/Tasks/IISWebAppDeployment/task.json
+++ b/Tasks/IISWebAppDeployment/task.json
@@ -6,7 +6,6 @@
   "helpMarkDown": "[More Information](http://aka.ms/iiswebappdeployreadme)",
   "category": "Deploy",
   "visibility": [
-    "Preview",
     "Build",
     "Release"
   ],

Overwrite

Now if we try to deploy it again, we’ll get the same error that the task still exists. One solution is to increment the version information. However if you do that, it could break future updates. So instead, we’ll use the –overwrite command. You can view the list of available options by using the –help command. The output is included below:

C:\Users\gheeres\vso-agent-tasks>tfx build tasks upload --help
TFS Cross Platform Command Line Interface v0.3.15
Copyright Microsoft Corporation

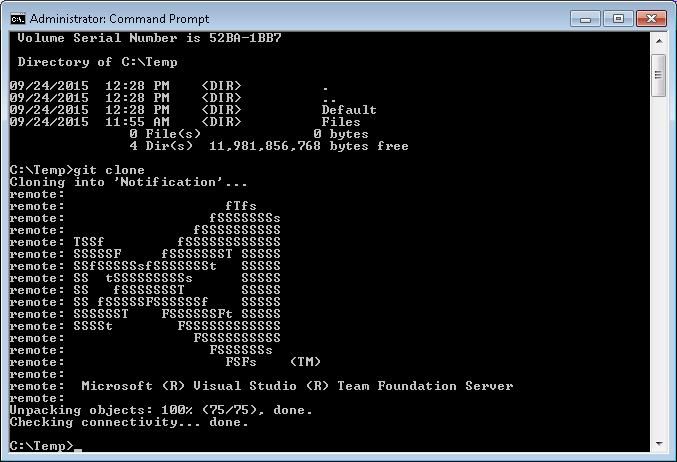
                        fTfs
                      fSSSSSSSs
                    fSSSSSSSSSS
     TSSf         fSSSSSSSSSSSS
     SSSSSF     fSSSSSSST SSSSS
     SSfSSSSSsfSSSSSSSt   SSSSS
     SS  tSSSSSSSSSs      SSSSS
     SS   fSSSSSSST       SSSSS
     SS fSSSSSFSSSSSSf    SSSSS
     SSSSSST    FSSSSSSFt SSSSS
     SSSSt        FSSSSSSSSSSSS
                    FSSSSSSSSSS
                       FSSSSSSs
                        FSFs    (TM)

Syntax:
tfx build tasks upload --arg1 arg1val1 arg1val2[...] --arg2 arg2val1 arg2val2[...]

Command: upload
Upload a Build Task.

Arguments:
  --task-path  Local path to a Build Task.
  --overwrite  Overwrite existing Build Task.

Global server command arguments:
  --auth-type    Method of authentication ('pat' or 'basic').
  --username     Username to use for basic authentication.
  --password     Password to use for basic authentication.
  --token        Personal access token.
  --service-url  URL to the service you will connect to, e.g. https://youraccount.visualstudio.com/DefaultCollection.
  --fiddler      Set up the fiddler proxy for HTTP requests (for debugging purposes).
  --proxy        Use the specified proxy server for HTTP traffic.

Global arguments:
  --help       Get help for any command.
  --save       Save arguments for the next time a command in this command group is run.
  --no-prompt  Do not prompt the user for input (instead, raise an error).
  --output     Method to use for output. Options: friendly, json, clipboard.
  --json       Alias for --output json.

To see more commands, type tfx build tasks --help

So let’s try deploying that again with the –overwrite option.

C:\Users\gheeres\vso-agent-tasks>tfx build tasks upload --task-path Tasks\IISWebAppDeployment --overwrite
TFS Cross Platform Command Line Interface v0.3.15
Copyright Microsoft Corporation

Task at C:\Users\gheeres\vso-agent-tasks\Tasks\IISWebAppDeployment uploaded successfully!

SUCCESS!!!

IISWebAppDeployment uploaded successfully!

Checking the list of available tasks, we see that it is now available. In a future post, I walk through our release configuration.

When setting up web applications, typically we want to use SSL by default. Instead of writing custom application code to redirect, we can configure IIS to automatically do the redirection for us.

Installing Url Rewrite

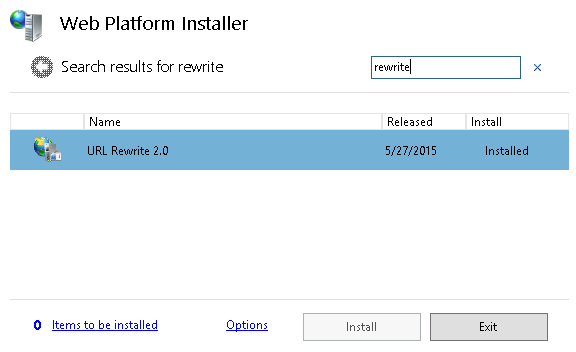
Install Url RewriteTo get started, the first thing you need to do is to use the Web Platform Installer to install the Url Rewrite module. Simply do a search for “rewrite” and then click on Install.

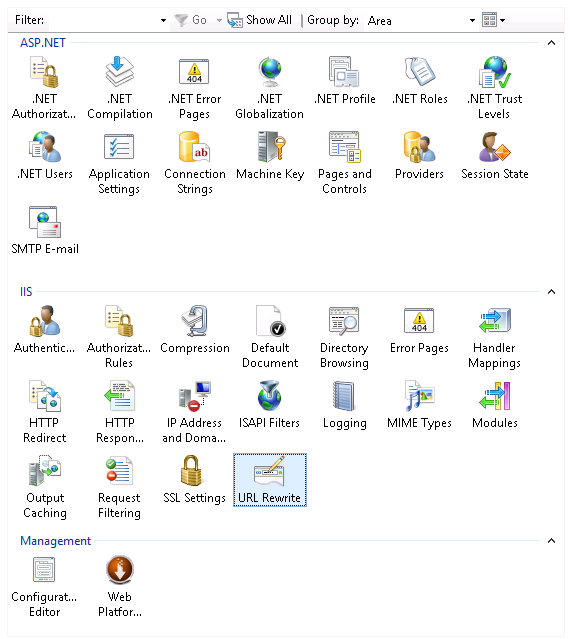
Once installed, you should have a new option available for the machine as well as the site and each application. Setting defined in Url Rewrite can be overridden successively where an application web.config will override the site web.config which will override the server web.config.

Rule To Redirect HTTP to HTTPS

Creating a rewrite for SSL is pretty simple. With the URL Rewrite applet open, follow these steps:

  1. URL Rewrite AppletOpen the “URL Rewrite” applet by double clicking on it.
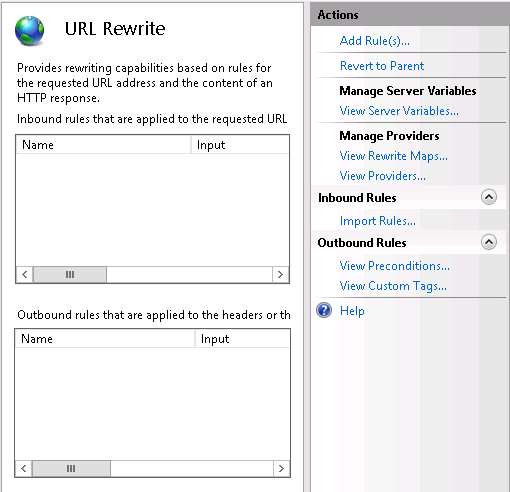
  2. Add Rule...Click on the “Add Rule(s)…” action at the right.
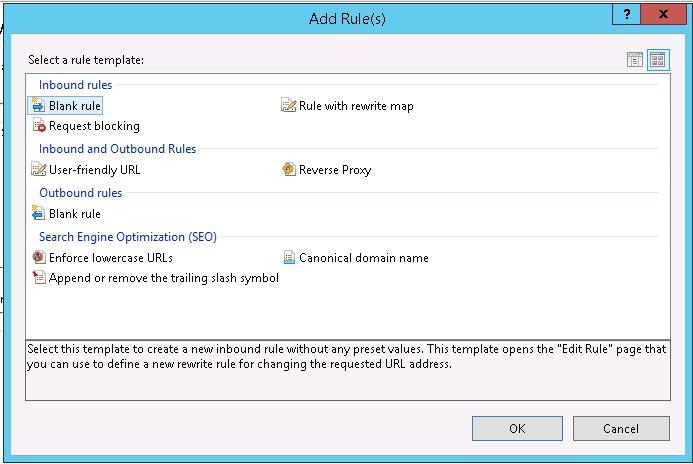
  3. Url Rewrite - Blank RuleChoose “Blank rule” from the “Inbound rules” and click on the OK button.
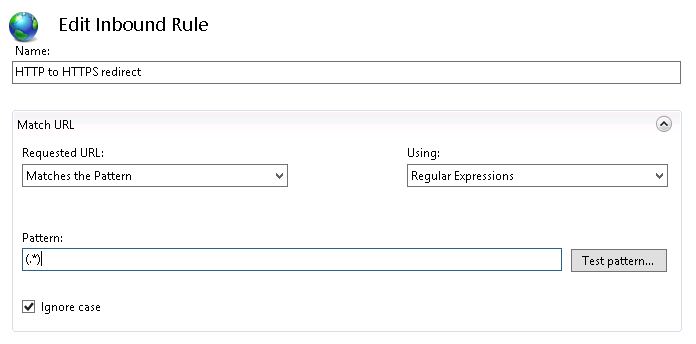
  4. Give the rule a name. In this case, let’s call it HTTP to HTTPS redirect
  5. Match UrlSet the regular expression pattern of the url you want to match or apply this filter to.

    Typically you can use (.*) which means to match everything.

    Use the “Test pattern…” to ensure that your regular expression is working correctly. Be careful with trailing slash matches.

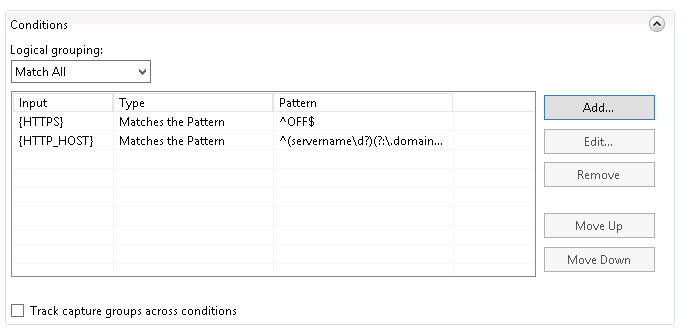
  6. Scroll down and expand the conditions grouping and click on the “Add…” button. We’re going to be adding two conditions.
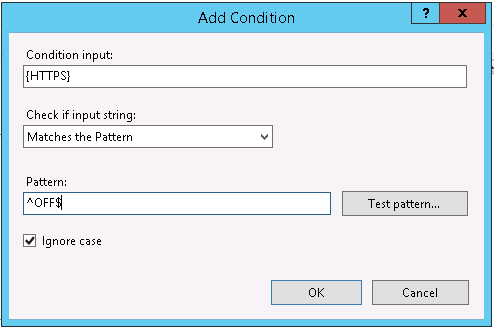
    • HTTPS EnvironmentAdd a match for the HTTPS environment variable checking for the value of OFF.
      Condition Input:
      {HTTPS}
      Pattern:
      ^OFF$
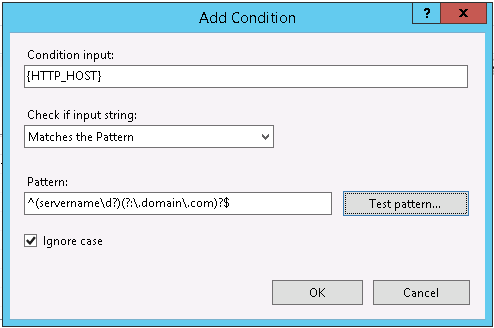
    • HTTP_HOST ConditionLastly we’ll add a match for the server name stored in the HTTP_HOST environment variable. You can omit this if you only have one site configured for your IIS installation.
      Condition Input:
      {HTTP_HOST}
      Pattern:
      ^(servername\d?)(?:\.domain\.com)?$

      Tip:Assuming you append a number to the end of a server name for each web server in the farm or cluster (i.e. servername1.domain.com, servername2.domain.com, etc.), the previous regular expression will match all of server names with a single digit, including servername.domain.com since the “?” match will match on 0 or 1 numbers.

      Adjust the regular expression as necessary for your environment. Make sure to use the “Test Pattern…” button to ensure you have your regular expression correct.

    • Rewrite ConditionsWhen you’re done, you should have two conditions set to Match All.
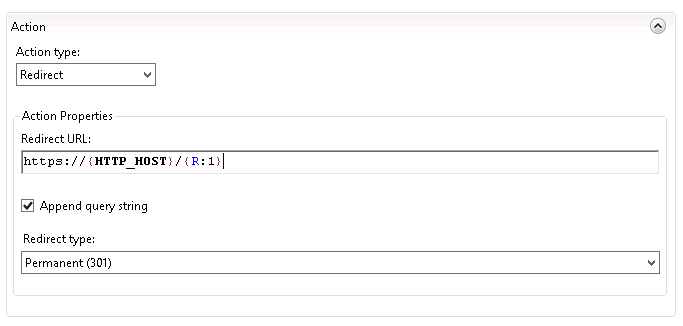
  7. URL Rewrite - ActionScroll down to the action grouping. Set the following values:
    Action type:
    Redirect
    Redirect URL:
    https://{HTTP_HOST}/{R:1}
    Append query string:
    checked
    Redirect type:
    Permanent (301)
  8. Url Rewrite FinishTo finish, click on the Apply button in the Actions pain at the right.

How It Works

The Url Rewrite applet works by adding configuration sections to the web.config file for the specified location. Instead of using the URL Rewrite, you can manually edit or add the necessary settings with careful XML editing. To do so, add a System.webServer section, if it doesn’t already exist, to your web.config. Then inside of the System.webServer XML element add the rewrite element to the existing element.

<?xml version="1.0" encoding="utf-8"?>
<configuration>
  <system.webServer>
    <rewrite>
      <rules>
        <clear />
        <rule name="HTTP to HTTPS redirect" enabled="true" stopProcessing="true">
          <match url="(.*)" />
          <conditions>
            <add input="{HTTPS}" pattern="^OFF$" />
            <add input="{HTTP_HOST}" pattern="^(servername\d?)(?:\.domain\.com)?$" />
          </conditions>
          <action type="Redirect" url="https://{HTTP_HOST}/{R:1}" />
        </rule>
      </rules>
    </rewrite>
  </system.webServer>
</configuration>

Note: If you manage an on-premise Team Foundation Server (TFS) server, I encourage you to do this by default to avoid your developers accidentally sending their credentials or confidential information in the clear of the network. Please note that each time you apply and update or upgrade to TFS, you’ll need to reapply the settings in the default web.config file. You can find this file at: C:\Program Files\Microsoft Team Foundation Server 14.0\Application Tier\Web Services\web.config

I stumbled across a link to the CommandPromptHere git hub repository and immediately thought to myself…

Hey I could use that!

So I installed it but it wasn’t quite what I wanted. In particular, like the built-in “open command window here” option, I only wanted it available when I held down the shift key.

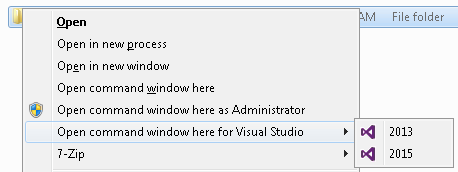
So after a bit of digging, I stumbled across the Microsoft article titled Creating Shortcut Menu Handlers. While reading the article, I discovered that through the registry we could create cascading menus. Hmm… I liked that idea even better. So after a bit more reading and frustration due to the poor documentation, I finally found success!!!

opencommandwindowhere-custom

commandprompt-defaultregistryAlthough I still hadn’t solved my original desire which was to make it activate only when you “Shift” right-click. Inspecting the default registry key (HKCR\Directory\Shell\Cmd), we find an empty string value labeled “Extended”. By simply adding this empty string value to our command, it now works as intended. That was easy!

But why stop there? How about an elevated command prompt? So a quick search lands us on the seven forums page labeled Add or Remove “Open Command Window Here as Administrator” to Context Menu. Add those registry settings and we’re all set.

Of course you can continue to customize to suit your needs and preferences.

For reference, here is the completed registry file.

[ Download ]

Windows Registry Editor Version 5.00

[HKEY_CLASSES_ROOT\Directory\Background]

[HKEY_CLASSES_ROOT\Directory\Background\shell]

[HKEY_CLASSES_ROOT\Directory\Background\shell\cmd]
@="@shell32.dll,-8506"
"Extended"=""
"NoWorkingDirectory"=""

[HKEY_CLASSES_ROOT\Directory\Background\shell\cmd\command]
@="cmd.exe /s /k pushd \"%V\""

[HKEY_CLASSES_ROOT\Directory\Background\shell\runas]
@="Open command window here as Administrator"
"Extended"=""
"HasLUAShield"=""

[HKEY_CLASSES_ROOT\Directory\Background\shell\runas\command]
@="cmd.exe /s /k pushd \"%V\""

[HKEY_CLASSES_ROOT\Directory\Background\shell\VisualStudio]
"Extended"=""
"subcommands"=""
"MUIVerb"="Open command window here for Visual Studio"

[HKEY_CLASSES_ROOT\Directory\Background\shell\VisualStudio\Shell]

[HKEY_CLASSES_ROOT\Directory\Background\shell\VisualStudio\Shell\2013CmdHere]
@="VS 2013 Prompt"
"Icon"="C:\\Program Files (x86)\\Microsoft Visual Studio 12.0\\Common7\\IDE\\devenv.exe,0"

[HKEY_CLASSES_ROOT\Directory\Background\shell\VisualStudio\Shell\2013CmdHere\command]
@="C:\\Windows\\system32\\cmd.exe /k cd \"%V\" && \"C:\\Program Files (x86)\\Microsoft Visual Studio 12.0\\Common7\\Tools\\VsDevCmd.bat\""

[HKEY_CLASSES_ROOT\Directory\Background\shell\VisualStudio\Shell\2015CmdHere]
@="VS 2015 Prompt"
"Icon"="C:\\Program Files (x86)\\Microsoft Visual Studio 14.0\\Common7\\IDE\\devenv.exe,0"

[HKEY_CLASSES_ROOT\Directory\Background\shell\VisualStudio\Shell\2015CmdHere\command]
@="C:\\Windows\\system32\\cmd.exe /k cd \"%1\" && \"C:\\Program Files (x86)\\Microsoft Visual Studio 14.0\\Common7\\Tools\\VsDevCmd.bat\""

[HKEY_CLASSES_ROOT\Directory\shell\runas]
@="Open command window here as Administrator"
"Extended"=""
"HasLUAShield"=""

[HKEY_CLASSES_ROOT\Directory\shell\runas\command]
@="cmd.exe /s /k pushd \"%V\""

[HKEY_CLASSES_ROOT\Directory\shell\VisualStudio]
"Extended"=""
"subcommands"=""
"MUIVerb"="Open command window here for Visual Studio"

[HKEY_CLASSES_ROOT\Directory\shell\VisualStudio\Shell]

[HKEY_CLASSES_ROOT\Directory\shell\VisualStudio\Shell\2013CmdHere]
@="2013"
"Icon"="C:\\Program Files (x86)\\Microsoft Visual Studio 12.0\\Common7\\IDE\\devenv.exe,0"

[HKEY_CLASSES_ROOT\Directory\shell\VisualStudio\Shell\2013CmdHere\command]
@="C:\\Windows\\system32\\cmd.exe /k cd \"%V\" && \"C:\\Program Files (x86)\\Microsoft Visual Studio 12.0\\Common7\\Tools\\VsDevCmd.bat\""

[HKEY_CLASSES_ROOT\Directory\shell\VisualStudio\Shell\2015CmdHere]
@="2015"
"Icon"="C:\\Program Files (x86)\\Microsoft Visual Studio 14.0\\Common7\\IDE\\devenv.exe,0"

[HKEY_CLASSES_ROOT\Directory\shell\VisualStudio\Shell\2015CmdHere\command]
@="C:\\Windows\\system32\\cmd.exe /k cd \"%1\" && \"C:\\Program Files (x86)\\Microsoft Visual Studio 14.0\\Common7\\Tools\\VsDevCmd.bat\""

[HKEY_CLASSES_ROOT\Drive\Background]

[HKEY_CLASSES_ROOT\Drive\Background\shell]

[HKEY_CLASSES_ROOT\Drive\Background\shell\cmd]
@="@shell32.dll,-8506"
"Extended"=""
"NoWorkingDirectory"=""

[HKEY_CLASSES_ROOT\Drive\Background\shell\cmd\command]
@="cmd.exe /s /k pushd \"%V\""

[HKEY_CLASSES_ROOT\Drive\Background\shell\runas]
@="Open command window here as Administrator"
"Extended"=""
"HasLUAShield"=""

[HKEY_CLASSES_ROOT\Drive\Background\shell\runas\command]
@="cmd.exe /s /k pushd \"%V\""

[HKEY_CLASSES_ROOT\Drive\Background\shell\VisualStudio]
"Extended"=""
"subcommands"=""
"MUIVerb"="Open command window here for Visual Studio"

[HKEY_CLASSES_ROOT\Drive\Background\shell\VisualStudio\Shell]

[HKEY_CLASSES_ROOT\Drive\Background\shell\VisualStudio\Shell\2013CmdHere]
@="VS 2013 Prompt"
"Icon"="C:\\Program Files (x86)\\Microsoft Visual Studio 12.0\\Common7\\IDE\\devenv.exe,0"

[HKEY_CLASSES_ROOT\Drive\Background\shell\VisualStudio\Shell\2013CmdHere\command]
@="C:\\Windows\\system32\\cmd.exe /k cd \"%V\" && \"C:\\Program Files (x86)\\Microsoft Visual Studio 12.0\\Common7\\Tools\\VsDevCmd.bat\""

[HKEY_CLASSES_ROOT\Drive\Background\shell\VisualStudio\Shell\2015CmdHere]
@="VS 2015 Prompt"
"Icon"="C:\\Program Files (x86)\\Microsoft Visual Studio 14.0\\Common7\\IDE\\devenv.exe,0"

[HKEY_CLASSES_ROOT\Drive\Background\shell\VisualStudio\Shell\2015CmdHere\command]
@="C:\\Windows\\system32\\cmd.exe /k cd \"%1\" && \"C:\\Program Files (x86)\\Microsoft Visual Studio 14.0\\Common7\\Tools\\VsDevCmd.bat\""

[HKEY_CLASSES_ROOT\Drive\shell\runas]
@="Open command window here as Administrator"
"Extended"=""
"HasLUAShield"=""

[HKEY_CLASSES_ROOT\Drive\shell\runas\command]
@="cmd.exe /s /k pushd \"%V\""

[HKEY_CLASSES_ROOT\Drive\shell\VisualStudio]
"Extended"=""
"subcommands"=""
"MUIVerb"="Open command window here for Visual Studio"

[HKEY_CLASSES_ROOT\Drive\shell\VisualStudio\Shell]

[HKEY_CLASSES_ROOT\Drive\shell\VisualStudio\Shell\2013CmdHere]
@="2013"
"Icon"="C:\\Program Files (x86)\\Microsoft Visual Studio 12.0\\Common7\\IDE\\devenv.exe,0"

[HKEY_CLASSES_ROOT\Drive\shell\VisualStudio\Shell\2013CmdHere\command]
@="C:\\Windows\\system32\\cmd.exe /k cd \"%V\" && \"C:\\Program Files (x86)\\Microsoft Visual Studio 12.0\\Common7\\Tools\\VsDevCmd.bat\""

[HKEY_CLASSES_ROOT\Drive\shell\VisualStudio\Shell\2015CmdHere]
@="2015"
"Icon"="C:\\Program Files (x86)\\Microsoft Visual Studio 14.0\\Common7\\IDE\\devenv.exe,0"

[HKEY_CLASSES_ROOT\Drive\shell\VisualStudio\Shell\2015CmdHere\command]
@="C:\\Windows\\system32\\cmd.exe /k cd \"%1\" && \"C:\\Program Files (x86)\\Microsoft Visual Studio 14.0\\Common7\\Tools\\VsDevCmd.bat\""

Cordova

Cordova: CLI Hooks

I recently did a code review of a Cordova project for a student team. Surprisingly, things looks pretty clean with the code, but I informed the team that they needed to properly setup their Cordova hooks to automate their build process. Some of my recommendations included the following:

  • Automatically add the necessary plugins that your app uses on the “after_platform_add” event.
  • Cleanup and remove any debug, map or non-minified JavaScript or CSS files in your platform assets folder on the “after_prepare”.
  • Automatically setup the ant.properties file for Android to specify the key to use for signing your release.

With Cordova, it’s recommended to write these script files in JavaScript and use the node.js interpreter to execute them.

The following example script I created will go through the WWW folder and remove any “extra” files to help minimize the size of your package.

#!/usr/bin/env node
var fs = require('fs-extra');

//
// This hook removes the specified javascript files (non-minified)
//

var folders = [
  'assets/www/lib/css/ionic.css',
  'assets/www/lib/js/ionic.js',
  'assets/www/lib/js/ionic.bundle.js',
  'assets/www/lib/js/ionic-angular.js',
  'assets/www/lib/js/underscore.js',
  'assets/www/lib/js/angular/angular.js',
  'assets/www/lib/js/angular/angular.min.js.map',
  'assets/www/lib/js/angular/angular-animate.js',
  'assets/www/lib/js/angular/angular-animate.min.js.map',
  'assets/www/lib/js/angular/angular-cookies.js',
  'assets/www/lib/js/angular/angular-cookies.min.js.map',
  'assets/www/lib/js/angular/angular-loader.js',
  'assets/www/lib/js/angular/angular-loader.min.js.map',
  'assets/www/lib/js/angular/angular-resource.js',
  'assets/www/lib/js/angular/angular-resource.min.js.map',
  'assets/www/lib/js/angular/angular-route.js',
  'assets/www/lib/js/angular/angular-route.min.js.map',
  'assets/www/lib/js/angular/angular-sanitize.js',
  'assets/www/lib/js/angular/angular-sanitize.min.js.map',
  'assets/www/lib/js/angular/angular-scenario.js',
  'assets/www/lib/js/angular/angular-touch.js',
  'assets/www/lib/js/angular/angular-touch.min.js.map',
  'assets/www/lib/js/angular-ui/angular-ui-router.js'
];

var rootdir = process.argv[2];
var platforms = (process.env.CORDOVA_PLATFORMS || '').split(',');
folders.forEach(function(folder) {
  (platforms || []).forEach(function(platform) {
    var filename = rootdir+'/platforms/'+platform+'/'+folder;
    fs.delete(filename, function(err) {
      if (err) {
        return(console.log('Failed to remove file "'+filename+'". Error: '+err));
      }
      console.log('Successfully removed folder/file "'+filename +'"');
    });
  });
});

Works For Me…

The team quickly replied back that they were getting an error when trying to write their own scripts. The script wasn’t running with the following command line output:

cmd.exe /s /c "<path to project root>\hooks\<event name>\<hook script>" "<project root>"

We checked Cordova versions (4.3) and everything was the same between machines. I tested their project with one of my scripts and it worked as expected. However, when running their script, I was getting the same error. Looking over their hook script, everything looked fine.

However, when comparing the shell output between a working script and a failing script. I discovered that the wrong interpretor was being run. Node.js was not being called to process the file. Below is a successful call:

Running command: "C:\Program Files\nodejs\node.exe" "<project root>\hooks\after_prepare\010_purge.js" "<project root>"

I began to suspect that file encoding was the problem. The #! at the beginning of the file wasn’t being honored. To verify, I copied and pasted the contents of my working script into their script file and it failed. If I copied and pasted the contents of their file into my working script file it would work. Although that might have been a work-around for the problem, I wanted to know why this wasn’t working.

Not knowing how the file was originally created or what editor was used by the team, I created a new file with Notepad++ and pasted their contents into that file. Saved it and it ran with no problem. So my suspicions were confirmed. Whatever editor they saved the file with didn’t use the right text encoding.

I sent my findings back to the students where they verified that the file had been created with Visual Studio. Further comparison of the files showed that Visual Studio was saving the file with byte-order mark (BOM). Removing the BOM from the file when saving allows the CLI tools on Windows to select the proper shell (node.js).

A co-worker was working on a new MVC project using role based authorization when he ran into a concern where a view was nearly identical between two different roles. The only difference between the views was one role had the ability to “Delete” and included a delete button, the other role didn’t have the delete capability.

One solution to the problem would have been to add the following code into the view:

if (User.IsInRole("Administrator")) {
  <button>delete</button>
}

Using the above wouldn’t be the end of the word, since the “Delete” action on the controller would be limited to only the “Administrator” role. However, in the future as the abilities of the two roles diverge, we’re likely to continue sprinkling more authorization code into our view creating a bundle of mud. I recommended the developer to create a dedicated view for each role, using partials where able to minimize code duplication.

By doing so, we can have the controller determine the correct view to render.

public class HomeController: Controller
{
  [AcceptVerbs(HttpVerbs.Get)]
  public virtual ActionResult Index()
  {
    if (User.IsInRole("Administrator")) {
        return (View("AdministratorIndex"));
    }
    return (View());
  }
}

That will work and is better than having the the authorization logic inside of the view. We could even make it better by moving the custom views into a subfolder based on the role to help keep our files organized.

- Views
  - Home
    - Administrator
      index.cshtml
    index.cshtml

That’ll help keep our role custom views organized.

But something still “smells” here. Our controller / action is now dealing with authorization concerns. Can we somehow move that authorization logic outside of our controller? Essentially our authorization logic is merely selecting what view to render. Let’s see if we can override the view selection logic…

ViewEngine (RazorViewEngine) To The Rescue

Looking at the ASP.NET MVC stack, we can see that there are ViewEngine classes, (RazorViewEngine, WebFormViewEngine) which will apply a set of rules to locating the appropriate view.

To implement this, we’ll create an RoleBasedRazorViewEngine class with the following contents:

/// <summary>
/// A razor based view engine that locates views based on their role.
/// </summary>
public class RoleBasedRazorViewEngine: RazorViewEngine
{
  private readonly IEnumerable<string> _roles;

  /// <summary>
  /// Creates an instance of the RoleBasedRazorViewEngine class.
  /// </summary>
  /// <param name="roles">The list of roles in priority order supported by the application.</param>
  public RoleBasedRazorViewEngine(IEnumerable<string> roles): this(roles, null)
  {
  }

  /// <summary>
  /// Creates an instance of the RoleBasedRazorViewEngine class.
  /// </summary>
  /// <param name="roles">The list of roles in priority order supported by the application.</param>
  /// <param name="viewPageActivator">The ViewPageActivator to use for page dependency resolution.</param>
  public RoleBasedRazorViewEngine(IEnumerable<string> roles, IViewPageActivator viewPageActivator): base(viewPageActivator)
  {
    _roles = roles ?? new String[0];

    AreaViewLocationFormats = new [] {
      "~/Areas/{2}/Views/{1}/{{0}}/{0}.cshtml",
      "~/Areas/{2}/Views/{1}/{{0}}/{0}.vbhtml",
      "~/Areas/{2}/Views/Shared/{{0}}/{0}.cshtml",
      "~/Areas/{2}/Views/Shared/{{0}}/{0}.vbhtml"
    }.Concat(base.AreaViewLocationFormats).ToArray();
    AreaMasterLocationFormats = new[] {
      "~/Areas/{2}/Views/{1}/{{0}}/{0}.cshtml",
      "~/Areas/{2}/Views/{1}/{{0}}/{0}.vbhtml",
      "~/Areas/{2}/Views/Shared/{{0}}/{0}.cshtml",
      "~/Areas/{2}/Views/Shared/{{0}}/{0}.vbhtml"
    }.Concat(base.AreaMasterLocationFormats).ToArray();
    AreaPartialViewLocationFormats = new[] {
      "~/Areas/{2}/Views/{1}/{{0}}/{0}.cshtml",
      "~/Areas/{2}/Views/{1}/{{0}}/{0}.vbhtml",
      "~/Areas/{2}/Views/Shared/{{0}}/{0}.cshtml",
      "~/Areas/{2}/Views/Shared/{{0}}/{0}.vbhtml"
    }.Concat(base.AreaPartialViewLocationFormats).ToArray();

    ViewLocationFormats = new[] {
      "~/Views/{1}/{{0}}/{0}.cshtml",
      "~/Views/{1}/{{0}}/{0}.vbhtml",
      "~/Views/Shared/{{0}}/{0}.cshtml",
      "~/Views/Shared/{{0}}/{0}.vbhtml"
    }.Concat(base.ViewLocationFormats).ToArray();
    MasterLocationFormats = new[] {
      "~/Views/{1}/{{0}}/{0}.cshtml",
      "~/Views/{1}/{{0}}/{0}.vbhtml",
      "~/Views/Shared/{{0}}/{0}.cshtml",
      "~/Views/Shared/{{0}}/{0}.vbhtml"
    }.Concat(base.MasterLocationFormats).ToArray();
    PartialViewLocationFormats = new[] {
      "~/Views/{1}/{{0}}/{0}.cshtml",
      "~/Views/{1}/{{0}}/{0}.vbhtml",
      "~/Views/Shared/{{0}}/{0}.cshtml",
      "~/Views/Shared/{{0}}/{0}.vbhtml"
    }.Concat(base.PartialViewLocationFormats).ToArray();
  }

  /// <summary>
  /// Creates a partial view using the specified controller context and partial path.
  /// </summary>
  /// <returns>
  /// The partial view.
  /// </returns>
  /// <param name="controllerContext">The controller context.</param><param name="partialPath">The path to the partial view.</param>
  protected override IView CreatePartialView(ControllerContext controllerContext, string partialPath)
  {
    return base.CreatePartialView(controllerContext, GetRoleBasedPath(controllerContext, partialPath));
  }

  /// <summary>
  /// Creates a view by using the specified controller context and the paths of the view and master view.
  /// </summary>
  /// <returns>
  /// The view.
  /// </returns>
  /// <param name="controllerContext">The controller context.</param>
  /// <param name="viewPath">The path to the view.</param>
  /// <param name="masterPath">The path to the master view.</param>
  protected override IView CreateView(ControllerContext controllerContext, string viewPath, string masterPath)
  {
    return base.CreateView(controllerContext, 
                           GetRoleBasedPath(controllerContext, viewPath), 
                           GetRoleBasedPath(controllerContext, masterPath));
  }

  /// <summary>
  /// Resolves the path based on the role information.
  /// </summary>
  /// <param name="controllerContext">The controller context.</param>
  /// <param name="viewPath">The path to the view.</param>
  /// <returns>The resolved view path.</returns>
  private string GetRoleBasedPath(ControllerContext controllerContext, string viewPath)
  {
    if ((! String.IsNullOrEmpty(viewPath)) && 
        (controllerContext.HttpContext.User != null)) {
      IPrincipal principal = controllerContext.HttpContext.User;
      foreach (string role in _roles.Where(role => principal.IsInRole(role))) {
        string resolvedViewPath = String.Format(CultureInfo.InvariantCulture, viewPath, role);
        if (base.FileExists(controllerContext, resolvedViewPath)) {
          return (resolvedViewPath);
        }
      }
    }
    return (viewPath);
  }

  /// <summary>
  /// Gets a value that indicates whether a file exists in the specified virtual file system (path).
  /// </summary>
  /// <returns>
  /// true if the file exists in the virtual file system; otherwise, false.
  /// </returns>
  /// <param name="controllerContext">The controller context.</param><param name="virtualPath">The virtual path.</param>
  protected override bool FileExists(ControllerContext controllerContext, string virtualPath)
  {
    if (controllerContext.HttpContext.User != null) {
      IPrincipal principal = controllerContext.HttpContext.User;
      if (_roles.Where(role => principal.IsInRole(role))
                .Any(role => base.FileExists(controllerContext, String.Format(CultureInfo.InvariantCulture, virtualPath, role)))) {
        return (true);
      }
    }
    return(base.FileExists(controllerContext, virtualPath));
  }

  /// <summary>
  /// Finds the specified partial view by using the specified controller context.
  /// </summary>
  /// <returns>
  /// The partial view.
  /// </returns>
  /// <param name="controllerContext">The controller context.</param>
  /// <param name="partialViewName">The name of the partial view.</param>
  /// <param name="useCache">true to use the cached partial view.</param>
  /// <exception cref="T:System.ArgumentNullException">The <paramref name="controllerContext"/> parameter is null (Nothing in Visual Basic).</exception>
  /// <exception cref="T:System.ArgumentException">The <paramref name="partialViewName"/> parameter is null or empty.</exception>
  public override ViewEngineResult FindPartialView(ControllerContext controllerContext, string partialViewName, bool useCache)
  {
    return(base.FindPartialView(controllerContext, partialViewName, false));
  }

  /// <summary>
  /// Finds the specified view by using the specified controller context and master view name.
  /// </summary>
  /// <returns>
  /// The page view.
  /// </returns>
  /// <param name="controllerContext">The controller context.</param>
  /// <param name="viewName">The name of the view.</param>
  /// <param name="masterName">The name of the master view.</param>
  /// <param name="useCache">true to use the cached view.</param>
  /// <exception cref="T:System.ArgumentNullException">The <paramref name="controllerContext"/> parameter is null (Nothing in Visual Basic).</exception>
  /// <exception cref="T:System.ArgumentException">The <paramref name="viewName"/> parameter is null or empty.</exception>
  public override ViewEngineResult FindView(ControllerContext controllerContext, string viewName, string masterName, bool useCache)
  {
    return (base.FindView(controllerContext, viewName, masterName, false));
  }
}

A Walkthrough

The logic is pretty simple.

All of the available application roles are injected into the RoleBasedRazorViewEngine in priority order. Basically if someone is a member of multiple roles, the first role with a matching view will be returned.

We prepend custom views paths to include a file path based on roles. The defaults paths use the .NET string formatting place holders. The default .NET placeholders for MVC paths are:

  • {0} – The name of the action.
  • {1} – The name of the controller.
  • {2} – The name of the area.

When dealing with .NET place holder values, if you actually want to output the value {0} in a string that is being formatted, you wrap it with double braces like {{0}}. In our custom paths, we want the default .NET MVC string substitutions to occur. After that parsing has occurred, we’ll do a second string format / replacement specifying each of the user’s roles.

  ViewLocationFormats = new[] {
    "~/Views/{1}/{{0}}/{0}.cshtml",
    "~/Views/{1}/{{0}}/{0}.vbhtml",
    "~/Views/Shared/{{0}}/{0}.cshtml",
    "~/Views/Shared/{{0}}/{0}.vbhtml"
  }.Concat(base.ViewLocationFormats).ToArray();

Given the previous example, for the Index action on the Home controller, our custom search path of view locations would be:

  "~/Views/Home/{0}/index.cshtml",
  "~/Views/Home/{0}/index.vbhtml",
  "~/Views/Shared/{0}/index.cshtml",
  "~/Views/Shared/{0}/index.vbhtml",
  "~/Views/Home/index.cshtml",
  "~/Views/Home/index.vbhtml",
  "~/Views/Shared/index.cshtml",
  "~/Views/Shared/index.vbhtml"

Or our second pass, we’ll dynamically fill in what {0} should be with one of the user’s roles.

In the FileExists method, we check to see if the user belongs to any of the predefined roles. At this point, we don’t actually return the name of the file, we just indicate if we can resolve the requested path.

  protected override bool FileExists(ControllerContext controllerContext, string virtualPath)
  {
    if (controllerContext.HttpContext.User != null) {
      IPrincipal principal = controllerContext.HttpContext.User;
      if (_roles.Where(role => principal.IsInRole(role))
                .Any(role => base.FileExists(controllerContext, String.Format(CultureInfo.InvariantCulture, virtualPath, role)))) {
        return (true);
      }
    }
    return(base.FileExists(controllerContext, virtualPath));
  }

If we had the following defined roles for our application: “Administrator”, “Operator”, “User”, the following file names would be searched in order.

  "~/Views/Home/Administrator/index.cshtml",
  "~/Views/Home/Administrator/index.vbhtml",
  "~/Views/Shared/Administrator/index.cshtml",
  "~/Views/Shared/Administrator/index.vbhtml",
  "~/Views/Home/Operator/index.cshtml",
  "~/Views/Home/Operator/index.vbhtml",
  "~/Views/Shared/Operator/index.cshtml",
  "~/Views/Shared/Operator/index.vbhtml",
  "~/Views/Home/User/index.cshtml",
  "~/Views/Home/User/index.vbhtml",
  "~/Views/Shared/User/index.cshtml",
  "~/Views/Shared/User/index.vbhtml",
  "~/Views/Home/index.cshtml",
  "~/Views/Home/index.vbhtml",
  "~/Views/Shared/index.cshtml",
  "~/Views/Shared/index.vbhtml"

If one of those paths match, the CreateView or CreatePartialView methods will dynamically expand the path using a helper function to locate the correct view based on the role.

  private string GetRoleBasedPath(ControllerContext controllerContext, string viewPath)
  {
    if ((! String.IsNullOrEmpty(viewPath)) && 
        (controllerContext.HttpContext.User != null)) {
      IPrincipal principal = controllerContext.HttpContext.User;
      foreach (string role in _roles.Where(role => principal.IsInRole(role))) {
        string resolvedViewPath = String.Format(CultureInfo.InvariantCulture, viewPath, role);
        if (base.FileExists(controllerContext, resolvedViewPath)) {
          return (resolvedViewPath);
        }
      }
    }
    return (viewPath);
  }

To use this new custom ViewEngine, we simply need to register it in our Global.asax.cs file.

    /// <summary>
    /// Occurs when the first resource is requested from the web server and the web application starts.
    /// </summary>
    protected void Application_Start()
    {
      ViewEngines.Engines.Clear();
      ViewEngines.Engines.Add(new RoleBasedRazorViewEngine(new[] { "Administrator", "Operator", "User" }));
    }

With the new view engine registered, we can go back and remove our authorization or view selection logic from our controller.

public class HomeController: Controller
{
  [AcceptVerbs(HttpVerbs.Get)]
  public virtual ActionResult Index()
  {
    return (View());
  }
}

Nice, simple, clean code with a separation of concerns! We let the view engine do it’s job and pick the right view for our controller action.

This is the script used for a talk I gave at the Central Wisconsin Developers Group on 01/28/2015.

Background

Welcome. Almost every game implements a game loop.

Quick show of hands

  • Who here has created a game?
  • Who has published a game?
  • Did anyone here create a game before 2000? After 2000?

A lot of things have changed since then. What was once the hardest part of writing a game, the graphics engine, is greatly simplified. Image formats have been standardized and lots of sample code is available for reading and writing these images. Simple graphic libraries know how to draw a line, circle or arch. But most importantly, they know how to draw a bitmap or image.

Let’s jump right into some code.

while (true) {
  // Do something
}

Can anyone tell me what is wrong with this code?

If you said an infinite loop, then you’d be correct… if we weren’t writing a game. That, is in essence a game loop. Thanks for coming…

There’s actually a little more to a game loop than that. But it’s still pretty simple.

while (isRunning) {
  // Get input
  // Update position
  // Clear screen
  // Draw
}

We’re just going to keep doing that until we quit. That’s it. That’s the basics of a game loop. Let’s go ahead and jump into some code.

Getting Started

Do we have any Android developers in the room? OK. When I get stuck, I’ll need you guys to help me.

Android Studio -> New Project
	Application name: gameloop
	Company Domain: heeresonline.com

Eclipse / Domain Precedence

Anyone here use Eclipse for Android development? Show of hands? Anyone notice a difference? For Java applications, it’s recommended to write in domain precedence (com.heeresonline.application).

  • Use API 16
  • Blank Activity

Gradle, which is the new Android build system, will configure our project for us.

  • Remove the layout and the text.
  • Add image icon. Set icon to ic_launcher.
  • Make sure that icon is not at X=0 or Y=0.
  • Remove the padding* attributes.
  • Close XML layout.

Open the MainActivity.java class.

Remove everything but the onCreate() method.

For the sake or brevity, we’ll skip over a discussion of the Android lifecycle. But essentially we use the onCreate() as our constructor.

The first step is to grab a reference to our ImageView using the standard Android resource names.

        final ImageView image = (ImageView) findViewById(R.id.imageView);

Next, we need some way to refresh the screen at a set interval. For our initial naive implementation, we’ll schedule a timer to execute every X milliseconds. Looking through the Android library, the Timer class should work for us.

The timer is basically a way to run threads on a Java platform.

Add the following to the the onCreate method.

    private final int FPS = 40;
    
    @Override
    protected void onCreate(Bundle savedInstanceState) {
        super.onCreate(savedInstanceState);
        setContentView(R.layout.activity_main);

        final ImageView image = (ImageView) findViewById(R.id.imageView);
        Timer timer = new Timer();
        timer.scheduleAtFixedRate(new TimerTask() {
            @Override
            public void run() {
            }
          }, 0, 1000 / FPS);
    }

We create our timer and schedule it to run at a “fixed” rate. The first parameter is our delegate to run. The second parameter is the delay before the task is run. The third parameter is the period or how often the timer should run. So is case, we want 40 fps, so the timer will execute every 25 milliseconds.

1000 milliseconds = 1 second / 40 frames per seconds = 25 milliseconds per frame

Inside of our run() is where our game loop will live.
Before we get too far, we need to create a couple of variables to keep track of our game sprite.

    private int directionX = 1;
    private int directionY = 1;
    private int speed = 10;

The direction parameters we’ll use to easily reverse our sprite direction. The speed is obviously how many pixels the sprite moves per “tick” of our game loop. So, lets update our game loop to move our sprite.

First we’ll get the current position.

                int x = image.getX();
                int y = image.getY();

Then we’ll go ahead and increment that position.

                image.setX(x + (speed * directionX));
                image.setY(y + (speed * directionY));

Threads Beware

But, can anyone tell me what is wrong with this code?

Correct, only the UI thread can access UI components. To do that, we have to request our code to run on the UI thread. If the current thread is NOT the UI thread, then an event is posted to the UI thread queue.

              MainActivity.this.runOnUiThread(new Runnable() {
                  @Override
                  public void run() {
                  }
              });

And then we’ll move our code into the runOnUiThread method.

Let’s go ahead and see what we’ve created so far. Oops… our sprite went off the screen and is going off to explore pluto…

So what we need to do now is some basic collision detection. We want to change the X or Y direction if the sprite hits one of the edges. First thing we need to do, is get the bounds for our screen. To do that, we’ll use the WindowManager class to get a Display object:

    private Point screen = new Point();

    @Override
    protected void onCreate(Bundle savedInstanceState) {
        Display display = getWindowManager().getDefaultDisplay();
        display.getSize(screen);

Now we know our left and bottom limits. Let’s update our movement calculations:

                        int x = (int) image.getX();
                        int y = (int) image.getY();

                        if ((x >= screen.x) || (x <= 0)) {
                            directionX *= -1;
                        }
                        if ((y >= screen.y) || (y <= 0)) {
                            directionY *= -1;
                        }

                        image.setX(x + (speed * directionX));
                        image.setY(y + (speed * directionY));

If you watch closely, you can see that our sprite moves behind the android title bar and virtual buttons at the bottom of the screen. We have a couple of options to solve this depending on if you want the title bar and buttons to be available. Since we’re creating a game, we probably want a full screen view anyway so we’ll just go ahead and turn the title off. Add the following to the onCreate() method.

        requestWindowFeature(Window.FEATURE_NO_TITLE);
        super.onCreate(savedInstanceState);
        setContentView(R.layout.activity_main);
        getWindow().setFlags(WindowManager.LayoutParams.FLAG_FULLSCREEN, WindowManager.LayoutParams.FLAG_FULLSCREEN);

Optionally, the same can be accomplished by changing the default theme. This may be set in the AndroidManifest.xml file or the style.xml file. The setting we want to use is:

Theme.AppCompat.Light.NoActionBar

The other problem we see is that our spite goes too far to the right or bottom. The reason being is that we’re ignoring the width and height of the item. If the Android canvas system, the X,Y coordinate refers to the upper left corner. To fix this, we just need to take the width and height into consideration for the the right and bottom.

                        if (((x + (image.getWidth())) >= screen.x) || (x <= 0)) {
                            directionX *= -1;
                        }
                        if (((y + image.getHeight()) >= screen.y) || (y <= 0)) {
                            directionY *= -1;
                        }

If you want the item to move faster, we can go ahead and increase our speeds.

	private int speed = 100;

And there we have a simple game loop.

So what do you think?

What’s wrong with our implementation? There are a number of problems, a few of which are:

  • It’s impractical to pre-create our game scene. A game will typically have hundreds of items on the screen at a time.
  • Our implementation is NOT very efficient.
  • We don’t handle lag or slower devices.

Using the SurfaceView

So, lets work on fixing some of those problems. Android actually provides a view called SurfaceView which gives us more control over our rendering. Start off by creating a new java class inherited from SurfaceView.

public class GameSurfaceView extends SurfaceView {
  public GameSurfaceView(Context context) {
    super(context);
  }
}

Now, lets update our MainActivity to use our new SurfaceView. We’ll remove the majority of the code that we wrote. The main thing is that we’ll set the content view to be our new GameSurfaceView which we’ll create.

protected GameSurfaceView gameView;

public class MainActivity extends ActionBarActivity {
    @Override
    protected void onCreate(Bundle savedInstanceState) {
        requestWindowFeature(Window.FEATURE_NO_TITLE);
        super.onCreate(savedInstanceState);
        getWindow().setFlags(WindowManager.LayoutParams.FLAG_FULLSCREEN, WindowManager.LayoutParams.FLAG_FULLSCREEN);

        gameView = new GameSurfaceView(this);
        setContentView(gameView);
    }
}

We’ll also want to handle some of the Android activity lifecycle. In particular, we want our game loop to pause and start based on the activity lifecycle. Our users wouldn’t like the game to keep running in the background. We’ll need to override the onPause() and onResume() methods. Add the following code:

  @Override
  protected void onResume() {
    super.onResume();
    gameView.resume();
  }

  @Override
  protected void onPause() {
    super.onPause();
    gameView.pause();
  }

The pause() and resume() methods are displaying an error because we need to write them quickly. We’ll stub them out in our GameSurfaceView class.

  /**
   * Start or resume the game.
   */
  public void resume() {
  }

  /**
   * Pause the game loop
   */
  public void pause() {
  }

With any development, not only Android, we don’t want any CPU intensive operations to run on our UI thread. So we’ll setup our SurfaceView implementation to implement threading.

public class GameSurfaceView extends SurfaceView implements Runnable

  @Override
  public void run() {
  }

Let’s finish handling our thread. First let’s define some variable. The first is a boolean to know if the thread should be running, the second is our thread variable.

  private boolean isRunning = false;
  private Thread gameThread;

  public void resume() {
    isRunning = true;
    gameThread = new Thread(this);
    gameThread.start();
  }

The pause() is a little more complicated due to handling the thread termination and potential exception. First we change our isRunning flag to stop the game loop. Then we wait for our game thread to exit.

  /**
   * Pause the game loop
   */
  public void pause() {
    isRunning = false;
    boolean retry = true;
    while (retry) {
      try {
        gameThread.join();
        retry = false;
      } catch (InterruptedException e) {
        // try again shutting down the thread
      }
    }
  }

Now, all that remains is to handle the run() portion of the thread. But before we do that, we need to look at how the SurfaceView works. The SurfaceView is designed so it is Z ordered behind the window holding it. The SurfaceView then punches a hole in it’s window to allow its surface to be displayed. The standard view hierarchy will take care of additional view compositioning. In short, this allows other views (i.e. buttons, labels, etc.) to overlay the surface.

With the SurfaceView, we first need to lock the canvas to request a frame. Then we render the frame. And lastly we unlock the frame and notify the Android system to update. The SurfaceHolder class helps to manage this for us.

  private SurfaceHolder holder;

  public GameSurfaceView(Context context) {
    super(context);

    holder = getHolder();
    // Here we can handle additional surface notifications (i.e. created, destroyed, etc.)
    // holder.addCallback();
  }

Next, we fill in the outline for our run() method.

  @Override
  public void run() {
    while(isRunning) {
      // We need to make sure that the surface is ready
      if (! holder.getSurface().isValid()) {
        continue;
      }

      // update

      // draw
      Canvas canvas = holder.lockCanvas();
      if (canvas != null) {
        // canvas.draw(...);
        holder.unlockCanvasAndPost(canvas);
      }
    }
  }

Based on the Android documentation, the Surface may NOT always be available. So at each iteration of our loop, we first check to see if the surface is ready. Then we grab our canvas by requesting a lock, draw to the canvas and then release the lock on that frame.

But before we get too far, we need to add a few variables to track time. Why? Our current loop doesn’t take into account CPU speed. So on older devices, our game will run slow but on newer devices it will run too fast.

*** Switch to presentation ***

Add the following constants which will determine our update interval.

  private final static int MAX_FPS = 40; //desired fps   
  private final static int FRAME_PERIOD = 1000 / MAX_FPS; // the frame period  

Now, we need to keep track of how much time has elapsed since the last update. To do that, we’ll just keep updating a variable which we can use to calculate the delta or difference in time.

  public void run() {
    while(isRunning) {
      // We need to make sure that the surface is ready
      if (! holder.getSurface().isValid()) {
        continue;
      }

      long started = System.currentTimeMillis();

      // update

      // draw
      Canvas canvas = holder.lockCanvas();
      if (canvas != null) {
        // canvas.draw(...);
        holder.unlockCanvasAndPost(canvas);
      }

      float deltaTime = (System.currentTimeMillis() - started);
    }
  }

Now, we’ll handle the case where our loop game loop finishes too soon. After the draw, we add the following:

      int sleepTime = (int) (FRAME_PERIOD - deltaTime);
      if (sleepTime > 0) {
        try {
          gameThread.sleep(sleepTime);
        }
        catch (InterruptedException e) {
        }
      }

If the time it took us to update or game loop and render is less than the expected FRAME_PERIOD, then we simply sleep the thread the specified amount of time.

However, in the case that it took us too long to execute, we instead will want to skip the rendering code to get back in sync. We’ll simply keep updating our game position until we’re back into sync.

      while (sleepTime < 0) {
        // update
        sleepTime += FRAME_PERIOD;
      }

In your code, you’d probably want to keep track of the number of skipped frames and only allow a certain number of frames to skip.

Now we need to actually fill in our update loop. Since we need to call that code from two different places, it’s obvious we should create a method. Let’s create our update() method.

  protected void step() {
  }

  @Override
  public void run() {
  ...
      // update
      step();
  ...
      while (sleepTime < 0) {
        step();
        sleepTime += FRAME_PERIOD;
      }
  ...
  }

OK. So lets get something drawn on the screen. To start, lets create a Sprite object to encapsulate our game object. This will allow us to manage multiple objects.

  class Sprite {
    int x;
    int y;
    int directionX = 1;
    int directionY = 1;
    int speed = 100;
    Bitmap image;
    
    public Sprite(int x, int y) {
      this.x = x;
      this.y = y;
    }

    public Sprite(int x, int y, Bitmap image) {
      this(x, y);
      this.image = image;
    }
  }

Now, lets draw it to the canvas and lets take the opportunity to refactor our draw method.

  protected void render(Canvas canvas) {
  }

  @Override
  public void run() {
  ...
      // draw
      Canvas canvas = holder.lockCanvas();
      if (canvas != null) {
        render(canvas);
        holder.unlockCanvasAndPost(canvas);
      }
  ...
  }

In our draw, we’ll create our Sprite object and draw it to the screen.

  private int x = 100;
  private int y = 100;
  protected void render(Canvas canvas) {
    Sprite sprite = new Sprite(x, y);
    sprite.image = BitmapFactory.decodeResource(this.getResources(), R.drawable.ic_launcher);

    canvas.drawBitmap(sprite.image, sprite.x, sprite.y, null);
  }

Let’s go ahead and see try this.

Now what’s wrong…

So can anyone tell me what’s wrong here?

If you said that the Sprite and bitmap load shouldn’t be happening in the render() method then you’re correct. Loading bitmaps should be done during our game or level initialization. Both our update() and render() methods need to be as lean as possible.

So, let’s go ahead and fix that by created an array of elements.

  private Sprite[] sprites;
  public GameSurfaceView(Context context) {
  ...
    sprites = new Sprite[] {
      new Sprite(100, 100, BitmapFactory.decodeResource(this.getResources(), R.drawable.ic_launcher))
    }
  }
  protected void render(Canvas canvas) {
    for (int index = 0, length = sprites.length; index < length; index++) {
      canvas.drawBitmap(sprites[index].image, sprites[index].x, sprites[index].y, null);
    }
  }

Now we can go ahead and add our game logic to move our sprite to the step() method.

  protected void step() {
    for (int index = 0, length = sprites.length; index < length; index++) {
      Sprite sprite = sprites[index];

      if ((sprite.x < 0) || ((sprite.x + sprite.image.getWidth()) > screenWidth)) {
        sprite.directionX *= -1;
      }
      if ((sprite.y < 0) || ((sprite.y + sprite.image.getHeight()) > screenHeight)) {
        sprite.directionY *= -1;
      }

      sprite.x += (sprite.directionX * sprite.speed);
      sprite.y += (sprite.directionY * sprite.speed);
    }
  }

We need to head back and set the screen width and height. We can use the callback that we ignored earlier and implement the surfaceChanged() method.

  private int screenWidth;
  private int screenHeight;

  public GameSurfaceView(Context context) {
    super(context);

    holder = getHolder();
    holder.addCallback(new SurfaceHolder.Callback() {
      @Override
      public void surfaceCreated(SurfaceHolder holder) {
      }

      @Override
      public void surfaceChanged(SurfaceHolder holder, int format, int width, int height) {
        screenWidth = width;
        screenHeight = height;
      }

      @Override
      public void surfaceDestroyed(SurfaceHolder holder) {
      }
    });
    ...
  }

So let’s run it. You’ll notice that we have a “ghosting” effect. The reason being is that when we implement a SurfaceView, we are responsible for invalidating or clearing the screen. The fix is simple. Add the following to our render() method.

  protected void render(Canvas canvas) {
    canvas.drawColor(Color.BLACK);
    for (int index = 0, length = sprites.length; index < length; index++) {
      canvas.drawBitmap(sprites[index].image, sprites[index].x, sprites[index].y, null);
    }
  }

Of course, a game with only one item on the screen is boring. So let’s add a new item and get them to interact with each other. Add another new item.

    sprites = new Sprite[] {
      new Sprite(100, 100, BitmapFactory.decodeResource(this.getResources(), R.drawable.ic_launcher)),
      new Sprite(600, 400, BitmapFactory.decodeResource(this.getResources(), R.drawable.ic_launcher))
    };

Let’s make sure that works.

Let’s make it easier to tell the difference between our two sprites. We could use a new bitmap. But instead, let’s just add a color attribute to our sprite.

  class Sprite {
  ...
    int color = 0;
  ...
    public Sprite(int x, int y, Bitmap image, int color) {
      this(x, y, image);
      this.color = color;
    }
  }

Now let’s update our render() method to draw with a color overlay.

  protected void render(Canvas canvas) {
    canvas.drawColor(Color.BLACK);
    for (int index = 0, length = sprites.length; index < length; index++) {
      Paint p = null;
      if (sprites[index].color != 0) {
        p = new Paint();
        ColorFilter filter = new LightingColorFilter(sprites[index].color, 0);
        p.setColorFilter(filter);
      }

      canvas.drawBitmap(sprites[index].image, sprites[index].x, sprites[index].y, p);
    }
  }

Lastly, let’s update our initializer to set the color.

    sprites = new Sprite[] {
      new Sprite(100, 100, BitmapFactory.decodeResource(this.getResources(), R.drawable.ic_launcher)),
      new Sprite(600, 400, BitmapFactory.decodeResource(this.getResources(), R.drawable.ic_launcher), Color.RED)
    };

Now, lets add some collision detection. Android provides a Rect class that provides a static intersects() method. We’ll add the following collision detection code into our step() method.

      if ((sprite.y < 0) || ((sprite.y + sprite.image.getHeight()) > screenHeight)) {
        sprite.directionY *= -1;
      }

      Rect current = new Rect(sprite.x, sprite.y,
                              sprite.x + sprite.image.getWidth(),
                              sprite.y + sprite.image.getHeight());
      for (int subindex = 0; subindex < length; subindex++) {
        if (subindex != index) {
          Sprite subsprite = sprites[subindex];
          Rect other = new Rect(subsprite.x, subsprite.y,
                                subsprite.x + subsprite.image.getWidth(),
                                subsprite.y + subsprite.image.getHeight());
          if (Rect.intersects(current, other)) {
            // Poor physics implementation.
            sprite.directionX *= -1;
            sprite.directionY *= -1;
          }
        }
      }

      sprite.x += (sprite.directionX * sprite.speed);
      sprite.y += (sprite.directionY * sprite.speed);

We can add more chaos by adding another Sprite.

    sprites = new Sprite[] {
      new Sprite(100, 100, BitmapFactory.decodeResource(this.getResources(), R.drawable.ic_launcher)),
      new Sprite(600, 400, BitmapFactory.decodeResource(this.getResources(), R.drawable.ic_launcher), Color.RED)
      new Sprite(400, 800, BitmapFactory.decodeResource(this.getResources(), R.drawable.ic_launcher), Color.BLUE);
    };

That is the basics of a game loop and simple collision detection.

Clean Code != Good Game Code

When reviewing the code though, we’ve actually created some problems in our critical step() and render() methods. Essentially we’ve written “good” object oriented code, however when doing game development sometimes you need to do things “wrong”.

In any automatic “garbage collection” system, you want to avoid creating and destroying short lived objects. Why? Because our game loop time is so precious, we don’t want the garbage collector (GC) to unnecessarily take away time in our update cycle. To get around the problem, you’ll want to create a pool of reusable items that you recycle items.

If you’ve done any Android development and used a custom Adapter for lists, this is the same concept of recycling used objects.

SOURCE CODE (Github)

UNTIL NEXT TIME…

While working on packaging some internal .Net libraries for publishing to our internal NuGet server, I encountered the following cryptic error:

D:\Projects\Company\Web>nuget pack Web.csproj -Prop Configuration=Release
Attempting to build package from 'Web.csproj'.
Packing files from 'D:\Projects\Company\Web\bin\Release'.
Using 'Web.nuspec' for metadata.
An error occurred while parsing EntityName. Line 10, position 35.

An error occurred while parsing EntityName. Line 10, position 35.

“EntityName”? What?!? Where did that variable or name come from? Checking my NuGet spec file. Everything looks fine.

<?xml version="1.0"?>
<package >
  <metadata>
    <id>$id$</id>
    <version>$version$</version>
    <title>$title$</title>
    <authors>George Heeres</authors>
    <owners>$author$</owners>
    <requireLicenseAcceptance>false</requireLicenseAcceptance>
    <description>$description$</description>
    <releaseNotes>Initial release.</releaseNotes>
    <copyright>Copyright 2014</copyright>
    <tags>company web mvc api webapi http json xml javascript</tags>
    <dependencies>
      <dependency id="Castle.Core" version="[3.0.0.4001,4.0)" />
      <dependency id="Castle.Windsor" version="[3.0.0.4001,4.0)" />
      <dependency id="Company.Core" version="(1,)" />
      <dependency id="Company.Logging" version="(1,)" />
      <dependency id="Company.Security" version="(1,)" />
    </dependencies>
  </metadata>
  <files>
    <file src="bin\Release-Net45\Company.Web.dll" target="lib\net45" />
    <file src="bin\Release-Net45\Company.Web.XML" target="lib\net45" />
  </files>
</package>

The NuGet spec allows for variables ($id$, etc.) to be replaced by values defined in our Assembly (typically AssemblyInfo.cs). In our AssemblyInfo.cs file we have the following:

using System.Reflection;
using System.Resources;
using System.Runtime.InteropServices;

// General Information about an assembly is controlled through the following 
// set of attributes. Change these attribute values to modify the information
// associated with an assembly.
[assembly: AssemblyTitle("Company.Web")]
[assembly: AssemblyDescription("Custom Web, Mvc & Http components, object and extensions.")]
#if DEBUG
[assembly: AssemblyConfiguration("Debug")]
#else
[assembly: AssemblyConfiguration("Release")]
#endif
[assembly: AssemblyCompany("Company")]
[assembly: AssemblyProduct("Company Web Framework")]
[assembly: AssemblyCopyright("Copyright © 2012,2013,2014; Company")]
[assembly: AssemblyTrademark("")]
[assembly: AssemblyCulture("")]
[assembly: NeutralResourcesLanguage("en-US")]

// Setting ComVisible to false makes the types in this assembly not visible 
// to COM components.  If you need to access a type in this assembly from 
// COM, set the ComVisible attribute to true on that type.
[assembly: ComVisible(false)]

// The following GUID is for the ID of the typelib if this project is exposed to COM
[assembly: Guid("1943f4e9-b0c0-4daf-bd62-27e2e33f9dc0")]

// Version information for an assembly consists of the following four values:
//
//      Major Version
//      Minor Version 
//      Build Number
//      Revision
//
// You can specify all the values or you can default the Build and Revision Numbers 
// by using the '*' as shown below:
// [assembly: AssemblyVersion("1.0.*")]
[assembly: AssemblyVersion("1.1.0")]

Note: The assembly file version (AssemblyFileVersion) is dynamically generated by the build script & tasks.

So can you spot the problem? I’ll give you a hint, it’s in the AssemblyDescription.

The problem is that “&” sign. Because our NuGet file is an XML file, the “&” value must be escaped. The solution is simple:

[assembly: AssemblyDescription("Custom Web, Mvc &amp; Http components, object and extensions.")]

Or optionally, we can leverage the English language and not be lazy…

[assembly: AssemblyDescription("Custom Web, Mvc and Http components, object and extensions.")]

The later solution may be preferrable because the Windows explorer file properties would display “&amp;” instead of “&”. Using “and” would be more agnostic.

Hopefully this post will save you some time!

As everyone knows, mocking the HttpContext and associated classes is a nightmare and should just be avoided. I recently joined a different team at work where they were still running a lot of .NET 1.0 code. Most of the code was poorly designed and highly coupled having been written primarily by developers without proper object oriented design training. Calling this code “spaghetti code” would have been an insult to spaghetti code.

How bad? Most methods are over 1000 lines of code, filled with nested if/else statements and copy/pasted code all over. Extracting the business logic from one method and class resulted in 15 new classes. Here is an quick example of the code quality.

if (_username.ToLower().PadRight(12, ' ').Substring(0, 7).Equals("demo123")) {
}

Lots of useless string parsing and casting to wade through… But anyway, that isn’t the point of this post. Long story short is that as I’m modularizing this code I’ve run into the dreaded HttpContext.Current integrated throughout the code. Before I make extensive changes to the code, I wanted to have some unit tests to ensure that I wasn’t breaking the existing functionality as I modified the code. So the first thing I did was to inject the HttpContext as a dependency into the class. Although far from ideal, it allows me to at least run the code outside of IIS.

Here is my test helper to get the HttpContext:

/// <summary>
/// Retreives an HttpContext for testing.
/// </summary>
/// <returns>An HttpContext for testing.</returns>
internal HttpContext GetHttpContext(string url = "http://127.0.0.1/")
{
  var request = new HttpRequest(String.Empty, url, String.Empty);
  var response = new HttpResponse(new StringWriter());
  var context = new HttpContext(request, response);
  return(context);
}

Unfortunately, the code has numereous references to Request.ServerVariables. If you try to add to this NameValueCollection you’ll find that it is a read only collection. Here is the decompiled code:

public sealed class HttpRequest
{
  private HttpServerVarsCollection _serverVariables;
  public NameValueCollection ServerVariables
  {
    get
    {
      if (HttpRuntime.HasAspNetHostingPermission(AspNetHostingPermissionLevel.Low)) {
        return this.GetServerVars();
      }
      return this.GetServerVarsWithDemand();
    }
  }
  private NameValueCollection GetServerVars()
  {
    if (this._serverVariables == null) {
      this._serverVariables = new HttpServerVarsCollection(this._wr, this);
      if (!(this._wr is IIS7WorkerRequest)) {
        this._serverVariables.MakeReadOnly();
      }
    }
    return this._serverVariables;
  }
}

We can’t override ServerVariables since it’s not virtual and there is no setter. Digging deeper finds an internal HttpServerVarsCollection class which has the following Add signature:

public override void Add(string name, string value)
{
  throw new NotSupportedException();
}

The rabbit hole keeps getting deeper. Fortunately we find the AddStatic method which gives us some hope:

internal void AddStatic(string name, string value)
{
  if (value == null) {
    value = string.Empty;
  }
  base.InvalidateCachedArrays();
  base.BaseAdd(name, new HttpServerVarsCollectionEntry(name, value));
}

That looks promising. So let’s try making this work using reflection.

  var field = request.GetType()
                     .GetField("_serverVariables", BindingFlags.Instance | BindingFlags.NonPublic);
  if (field != null) {
    var variables = field.GetValue(request);
    var type = field.FieldType;
    if (variables == null) {
      var constructor = type.GetConstructor(BindingFlags.Instance | BindingFlags.NonPublic, null,
                                            new[] { typeof(HttpWorkerRequest), typeof(HttpRequest) }, null);
      variables = constructor.Invoke(new[] { null, request });
    }
    type.GetProperty("IsReadOnly", BindingFlags.Instance | BindingFlags.NonPublic)
        .SetValue(variables, false, null);
    var addStatic = type.GetMethod("AddStatic", BindingFlags.Instance | BindingFlags.NonPublic);
    addStatic.Invoke(variables, new[] { "REMOTE_ADDR", "127.0.0.1" });
    addStatic.Invoke(variables, new[] { "HTTP_USER_AGENT", "Mozilla/5.0 (Windows NT 6.3; Win64; x64) AppleWebKit/537.36 (KHTML, like Gecko) Chrome/37.0.2049.0 Safari/537.36" });
  }

SUCCESS! But we can do even better. How about we make this code extend the HttpRequest object and clean things up a little.

/// <summary>
/// Extension methods for the HttpRequest class.
/// </summary>
public static class HttpRequestExtensions
{
  /// <summary>
  /// Adds the name/value pair to the ServerVariables for the HttpRequest.
  /// </summary>
  /// <param name="request">The request to append the variables to.</param>
  /// <param name="name">The name of the variable.</param>
  /// <param name="value">The value of the variable.</param>
  public static void AddServerVariable(this HttpRequest request, string name, string value)
  {
    if (request == null) return;

    AddServerVariables(request, new Dictionary<string, string>() {
      { name, value }
    });
  }

  /// <summary>
  /// Adds the name/value pairs to the ServerVariables for the HttpRequest.
  /// </summary>
  /// <param name="request">The request to append the variables to.</param>
  /// <param name="collection">The collection of name/value pairs to add.</param>
  public static void AddServerVariables(this HttpRequest request, NameValueCollection collection)
  {
    if (request == null) return;
    if (collection == null) return;

    AddServerVariables(request, collection.AllKeys
                                          .ToDictionary(k => k, k => collection[k]));
  }

  /// <summary>
  /// Adds the name/value pairs to the ServerVariables for the HttpRequest.
  /// </summary>
  /// <param name="request">The request to append the variables to.</param>
  /// <param name="dictionary">The dictionary containing the pairs to add.</param>
  public static void AddServerVariables(this HttpRequest request, IDictionary<string,string> dictionary)
  {
    if (request == null) return;
    if (dictionary == null) return;

    var field = request.GetType()
                       .GetField("_serverVariables", BindingFlags.Instance | BindingFlags.NonPublic);
    if (field != null) {
      var type = field.FieldType;

      var serverVariables = field.GetValue(request);
      if (serverVariables == null) {
        var constructor = type.GetConstructor(BindingFlags.Instance | BindingFlags.NonPublic, null,
                                              new[] { typeof(HttpWorkerRequest), typeof(HttpRequest) }, null);
        serverVariables = constructor.Invoke(new[] { null, request });
        field.SetValue(request, serverVariables);
      }
      var addStatic = type.GetMethod("AddStatic", BindingFlags.Instance | BindingFlags.NonPublic);

      ((NameValueCollection) serverVariables).MakeWriteable();
      foreach (var item in dictionary) {
        addStatic.Invoke(serverVariables, new[] { item.Key, item.Value });
      }
      ((NameValueCollection)serverVariables).MakeReadOnly();
    }
  }
}

You might have noticed, that I also created a NameValueCollection extension to modify the IsReadOnly property. Of course, use this with care… “with great power comes great responsibility“. The creator of the NameValueCollection you’re consuming likely set the IsReadOnly property for a reason…

/// <summary>
/// Extension methods for the NameValueCollection class.
/// </summary>
public static class NameValueCollectionExtensions
{
  /// <summary>
  /// Retreives the IsReadOnly property from the NameValueCollection
  /// </summary>
  /// <param name="collection">The collection to retrieve the propertyInfo from.</param>
  /// <param name="bindingFlags">The optional BindingFlags to use. If not specified defautls to Instance|NonPublic.</param>
  /// <returns>The PropertyInfo for the IsReadOnly property.</returns>
  private static PropertyInfo GetIsReadOnlyProperty(this NameValueCollection collection, BindingFlags bindingFlags = BindingFlags.Instance | BindingFlags.NonPublic)
  {
    if (collection == null) return (null);
    return(collection.GetType().GetProperty("IsReadOnly", bindingFlags));
  }

  /// <summary>
  /// Sets the IsReadOnly property to the specified value.
  /// </summary>
  /// <param name="collection">The collection to modify.</param>
  /// <param name="isReadOnly">The value to set.</param>
  private static void SetIsReadOnly(this NameValueCollection collection, bool isReadOnly)
  {
    if (collection == null) return;

    var property = GetIsReadOnlyProperty(collection);
    if (property != null) {
      property.SetValue(collection, isReadOnly, null);
    }
  }

  /// <summary>
  /// Makes the specified collection writable via reflection.
  /// </summary>
  /// <param name="collection">The collection to make writable.</param>
  public static void MakeWriteable(this NameValueCollection collection)
  {
    SetIsReadOnly(collection, false);
  }

  /// <summary>
  /// Makes the specified collection readonly via reflection.
  /// </summary>
  /// <param name="collection">The collection to make readonly.</param>
  public static void MakeReadOnly(this NameValueCollection collection)
  {
    SetIsReadOnly(collection, true);
  }
}

And there you have it. A way to add ServerVariables. Keep in mind that this code is extremely fragile because it’s using reflection to access the internal workings of code that we don’t have control over. Below are examples of using the extension method.

public class Example
{
  public void Test() 
  {
    string url = "http://127.0.0.1";
    var request = new HttpRequest(String.Empty, url, String.Empty);
    request.AddServerVariable("REMOTE_ADDR", "127.0.0.1");

    // or
    
    request.AddServerVariables(new Dictionary<string, string>() {
      { "REMOTE_ADDR", "127.0.0.1" },
      { "HTTP_USER_AGENT", "Mozilla/5.0 (Windows NT 6.3; Win64; x64) AppleWebKit/537.36 (KHTML, like Gecko) Chrome/37.0.2049.0 Safari/537.36" }
    });
  }
}

I hope you find this useful and it can save you some time.

I’m working on a project to bridge the gap between some legacy infrastructure code with newer infrastructure code based on a newer .NET framework code. The legacy infrastructure code is .NET 3.5, while the newer infrastructure code is a mixture of .NET 4.0 and 4.5. v4.5 framework usage is currently limited to modules implementing Windows Identity Foundation (WIF) v4.5. Thankfully, the bridging code doesn’t require those features so we can isolate just the relevant infrastructure code.

While writing the bridging code, I needed to compile the relevant portions of the newer infrastructure with 3.5 for compatibility. A couple of problems were encountered with backporting:

Usage of .NET 4.0 specific methods

There were two compilation problems:

String.IsNullOrWhiteSpace()

The first step was to fix the missing IsNullOrWhiteSpace() function. To do this, I simply created my own extension methods and related tests.

  /// <summary>
  /// Extensions to the string class.
  /// </summary>
  public static class StringExtensions
  {
    /// <summary>
    /// Indicates whether a specified string is null, empty, or consists only of white-space characters.
    /// </summary>
    /// <param name="value">The string to test.</param>
    /// <returns>true if the value parameter is null or String.Empty, or if value consists exclusively of white-space characters. </returns>
    public static bool IsNullOrWhiteSpace(this string value)
    {
#if NET35
      /// The IsNullOrWhiteSpace function was added in NET40
      return (String.IsNullOrEmpty(value) || (value.Trim().Length == 0));
#else
      return (String.IsNullOrWhiteSpace(value));
#endif
    }
  }

Inside of our *.csproj file, I set a CONSTANT based on the framework. There are lots of ways to do this, but the simplest is to just hard code it in the relevant PropertyGroup setting.

  <PropertyGroup Condition="'$(Configuration)|$(Platform)' == 'Debug-Net35|AnyCPU'">
    <DebugSymbols>true</DebugSymbols>
    <OutputPath>bin\Debug-Net35\</OutputPath>
    <DefineConstants>DEBUG;TRACE;NET35</DefineConstants>
    <DebugType>full</DebugType>
    <PlatformTarget>AnyCPU</PlatformTarget>
    <ErrorReport>prompt</ErrorReport>
    <TargetFrameworkVersion>v3.5</TargetFrameworkVersion>
    <CodeAnalysisRuleSet>MinimumRecommendedRules.ruleset</CodeAnalysisRuleSet>
  </PropertyGroup>

The line of interest is:

<DefineConstants>DEBUG;TRACE;NET35</DefineConstants>

An lastly we have our tests to make sure our implementation functions correctly:

  [TestClass]
  public class StringExtensionTests
  {
    [TestMethod]
    public void IsNullOrWhiteSpace_With_Null_Returns_True()
    {
      Assert.IsTrue(((string) null).IsNullOrWhiteSpace());      
    }

    [TestMethod]
    public void IsNullOrWhiteSpace_With_EmptyString_Returns_True()
    {
      Assert.IsTrue(String.Empty.IsNullOrWhiteSpace());
    }

    [TestMethod]
    public void IsNullOrWhiteSpace_With_Spaces_Returns_True()
    {
      Assert.IsTrue("   ".IsNullOrWhiteSpace());
    }

    [TestMethod]
    public void IsNullOrWhiteSpace_With_Linefeeds_Returns_True()
    {
      Assert.IsTrue("\r\n".IsNullOrWhiteSpace());
    }

    [TestMethod]
    public void IsNullOrWhiteSpace_With_Whitepace_Returns_True()
    {
      Assert.IsTrue(" \r\n   \t ".IsNullOrWhiteSpace());
    }

    [TestMethod]
    public void IsNullOrWhiteSpace_With_Nonwhitespace_Returns_False()
    {
      Assert.IsFalse("   NO WHITESPACE HERE  ".IsNullOrWhiteSpace());
    }
  }

Fixing the code is pretty simple. We add a reference to our namespace to enable the extension methods and then reverse the parameters for the code:

Before
String.IsNullOrWhiteSpace(where)
After
where.IsNullOrWhiteSpace()

String.Join()

In .NET 3.5, the String.Join() method has 2 overloads:

Join(String, String[])
Join(String, String[], Int32, Int32)

In .NET 4.0, there are now five overloads. The overloads mostly allow for an object instead of a string to be specified, along with the ability to use an IEnumerable.

Join(String, IEnumerable<String>)
Join<T>(String, IEnumerable<T>)
Join(String, Object[])
Join(String, String[])
Join(String, String[], Int32, Int32)

Unfortunately, the newer framework contained a number of LINQ statements which passed the statement as an IEnumerable. The solution was to simply add .ToArray() to the end of the IEnumerable.

Before
IEnumerable<T> items;
Func<T, object> output;
String.Join(",", items.Select((item) => (output != null) ? output.Invoke(item) : item))
After
String.Join(",", items.Select((item) => (output != null) ? output.Invoke(item) : item).ToArray())

Unfortunately, that isn’t enough since we need to convert our type of T to a string. Based on the documentation, and viewing the decompiled source for the method, we can see that the type of T is converted by simply calling the .ToString() method on the item. So we can simply fix that by adding .ToString() to each of the ternary results:

String.Join(",", items.Select((item) => (output != null) ? output.Invoke(item).ToString() : item.ToString()).ToArray())

BUT… what about if the invoked output or item are null? We can handle that all by simply using the Convert.ToString() method. And instead of doing it for each ternary result, we’ll just convert the final result from the ternary, making our code more readable and maintainable.

String.Join(",", items.Select((item) => Convert.ToString((output != null) ? output.Invoke(item) : item)))

External library dependencies

Now, the next step is getting conditional compilation working for our 3rd party libraries. Many of the tutorials you’ll find will show string matching against the $(TargetFrameworkVersion) build variable.

<PropertyGroup Condition=" '$(TargetFrameworkVersion)' == 'v3.5' ">
    <DefineConstants>NET35</DefineConstants>
</PropertyGroup>

Ideally, we’d like to be able to do a simple number comparison (i.e. $(TargetFrameworkVersion) > 3.5). Unfortunately, because $(TargetFrameworkVersion) is prefixed with a ‘v’ it’s not interpreted as a number. Not to worry though, in newer versions of MSBuild, we can actually make calls to the .NET library.

To start, we’re going to create a PropertyGroup AFTER the existing property groups. Any variables declared AFTER your property group are invalid and empty strings inside of your PropertyGroup. Then we’re going to create our own custom variable called TargetFrameworkVersionNumber that we can use in our conditional expressions. The simplest option is to simply hard code this value.

<PropertyGroup>
  <TargetFrameworkVersionNumber>2.0</TargetFrameworkVersionNumber>
</PropertyGroup>

While hard coding the value might work in simple scenarios, it can be tedious to maintain. Ideally, we’d like to dynamically set that value based on the $TargetFrameworkVersion value. While there are a number of ways to exclude the ‘v’ from the preceding value, such as using Double.Parse(), what fun would that be? We’re going to use a regular expression because they unlock the possibilities of what you can do.

<PropertyGroup>
  <TargetFrameworkVersionNumber>$([System.Text.RegularExpressions.Regex]::Replace($(TargetFrameworkVersion), '[^\d\.]+', '', System.Text.RegularExpressions.RegexOptions.IgnoreCase))</TargetFrameworkVersionNumber>
</PropertyGroup>

The above regular expression “[^\d\.]+”, simply says to match anything that isn’t a digit or a decimal point (period) and then replace those matches with an empty string / nothing. If you’re not already using regular expressions in your code, they’re worth their weight in gold to learn and most modern languages include support for them including JavaScript.

At this point, if we add a Target element with a Message to our *.csproj file, we can output and inspect the values.

<Target Name="BeforeBuild">
  <Message Text="$(TargetFrameworkVersionNumber)" Importance="High" />
</Target>

You should be able to see the output now during your compilation. Let’s create our conditional compilation statement now.

<ItemGroup Condition=" $(TargetFrameworkVersionNumber) >= 3.5 ">
  <Reference Include="Newtonsoft.Json, Version=4.5.0.0, Culture=neutral, PublicKeyToken=30ad4fe6b2a6aeed, processorArchitecture=MSIL">
    <SpecificVersion>False</SpecificVersion>
    <HintPath>..\packages\Newtonsoft.Json.4.5.7\lib\net35\Newtonsoft.Json.dll</HintPath>
  </Reference>
</ItemGroup>

Unfortunately, if you run or open this build file, you’ll get an error that you can’t compare the string “” with a number. Even though our number looks like a number, internally the build it treating it like a string. MSBuild is supposed to automatically convert from string to number, and vice versa, but “my mileage varied”… Not to worry, we can use some additional .NET library function calls to convert that string to a number for us.

<ItemGroup Condition=" $([System.Single]::Parse($(TargetFrameworkVersionNumber))) <= 3.5 ">
  <Reference Include="Newtonsoft.Json, Version=4.5.0.0, Culture=neutral, PublicKeyToken=30ad4fe6b2a6aeed, processorArchitecture=MSIL">
    <SpecificVersion>False</SpecificVersion>
    <HintPath>..\packages\Newtonsoft.Json.4.5.7\lib\net35\Newtonsoft.Json.dll</HintPath>
  </Reference>
</ItemGroup>

Here you see we made another call to $([System.Single]::Parse( )).

Unfortunately, now you’ll get an error the “The project file could not be loaded. ‘&lt’, hexadecimal value 0x3C, is an invalid attribute character.’. Thankfully, the fix is simple, you just need to encode the ‘<‘ as ‘&lt;’ as follows:

<ItemGroup Condition=" $([System.Single]::Parse($(TargetFrameworkVersionNumber))) &lt;= 3.5 ">
  <Reference Include="Newtonsoft.Json, Version=4.5.0.0, Culture=neutral, PublicKeyToken=30ad4fe6b2a6aeed, processorArchitecture=MSIL">
    <SpecificVersion>False</SpecificVersion>
    <HintPath>..\packages\Newtonsoft.Json.4.5.7\lib\net35\Newtonsoft.Json.dll</HintPath>
  </Reference>
</ItemGroup>

Now, under each ItemGroup, you can add the custom references that are framework version dependent. You don’t need to repeat the ItemGroup for each Reference you want to add for each framework. Just add additional Reference items accordingly.

<Choose>
  <When Condition=" $([System.Single]::Parse($(TargetFrameworkVersionNumber))) &lt;= 3.5 ">
    <ItemGroup>
      <Reference Include="Newtonsoft.Json, Version=4.5.0.0, Culture=neutral, PublicKeyToken=30ad4fe6b2a6aeed, processorArchitecture=MSIL">
        <SpecificVersion>False</SpecificVersion>
        <HintPath>..\packages\Newtonsoft.Json.4.5.7\lib\net35\Newtonsoft.Json.dll</HintPath>
      </Reference>
    </ItemGroup>
  </When>
  <Otherwise>
    <ItemGroup>
      <Reference Include="Newtonsoft.Json, Version=4.5.0.0, Culture=neutral, PublicKeyToken=30ad4fe6b2a6aeed, processorArchitecture=MSIL">
        <SpecificVersion>False</SpecificVersion>
        <HintPath>..\packages\Newtonsoft.Json.4.5.7\lib\net35\Newtonsoft.Json.dll</HintPath>
      </Reference>
    </ItemGroup>
  </Otherwise>
</Choose>

Hopefully that helps you when attempting to backport a library or do conditional compilation in your projects.

References / Additional Information