I was working on setting up a DRBD cluster to use for NFS storage for VMWare. Although I had done this numerous times on Gentoo based distributions, this was the first time I was using CentOS. Getting DRBD installed and configured was pretty simple. In this example /dev/sdb is my physical or underlying device.
DRBD
First step is to add the ELRepo repository which contains the packages for DRBD.
rpm -ivh http://elrepo.org/elrepo-release-6-5.el6.elrepo.noarch.rpm
Next do the install.
yum install -y kmod-drbd84 drbd84-utils
Now we can configure our DRBD resource.
Improving Performance
At first, the network performance was poor even after changing the network MTU to 9000. We were averaging about 40MB/s, less than 1/3 of our maximum 1Gb network performance.
version: 8.4.5 (api:1/proto:86-101)
GIT-hash: 1d360bde0e095d495786eaeb2a1ac76888e4db96 build by mockbuild@Build64R6, 2014-08-17 19:26:04

 1: cs:SyncTarget ro:Primary/Primary ds:Inconsistent/UpToDate C r-----
    ns:0 nr:45725696 dw:45724672 dr:0 al:0 bm:0 lo:2 pe:2 ua:1 ap:0 ep:1 wo:f oos:5196995292
        [>....................] sync'ed:  0.2% (5075188/5081664)M
        finish: 36:11:07 speed: 39,880 (39,224) want: 50,280 K/sec
At that speed, the initial sync was going to take 36+ hours!!! But after a little bit of tweeking to the configuration based on our underlying hardware, we achieved a 2.5x performance increase.
version: 8.4.5 (api:1/proto:86-101)
GIT-hash: 1d360bde0e095d495786eaeb2a1ac76888e4db96 build by mockbuild@Build64R6, 2014-08-17 19:26:04

 1: cs:SyncTarget ro:Primary/Primary ds:Inconsistent/UpToDate C r-----
    ns:0 nr:13627448 dw:13626368 dr:608 al:0 bm:0 lo:1 pe:0 ua:1 ap:0 ep:1 wo:d oos:5026573020
        [>....................] sync'ed:  0.3% (4908760/4922068)M
        finish: 13:36:03 speed: 102,656 (89,644) want: 102,400 K/sec
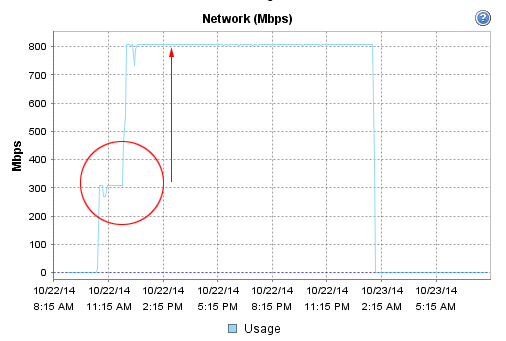
2.5x performance increase!
That’s MUCH better! The little blips in the graph is when I was playing around with settings. In the end, the initial sync still took 11 hours for the 5TB disk to complete.
Below is the final result of our configuration file: /etc/drbd.d/nfs-mirror.res.
resource nfs-mirror {
  startup {
    wfc-timeout 30;
    outdated-wfc-timeout 20;
    degr-wfc-timeout 30;

    become-primary-on both;
  }

  net {
    protocol C;

    allow-two-primaries;

    after-sb-0pri discard-least-changes;
    after-sb-1pri discard-secondary;
    after-sb-2pri violently-as0p;

    rr-conflict disconnect;

    max-buffers 8000;
    max-epoch-size 8000;
    sndbuf-size 512k;
  }

  disk {
    al-extents 3389;

    disk-barrier no;
    disk-flushes no;
  }

  syncer {
    rate 100M;
    verify-alg sha1;
  }

  on host1 {
    device minor 1;
    disk /dev/sdb;
    address 192.168.55.1:7789;
    meta-disk internal;
  }

  on host2 {
    device minor 1;
    disk /dev/sdb;
    address 192.168.55.2:7789;
    meta-disk internal;
  }
}
Now that we had DRBD configured it was time to setup our NFS servers.
Creating our LVM Volumes
And that’s when the fun began…
Instead of having to deal with the complexities of a clustered file system (i.e. OCFS2,GFS) that would allow a true primary/primary mode, we decided to split the storage in half and each ESXi host would have one of the volumes mounted. In the event of a problem with one of the NFS servers, the remaining NFS server could take over the duties of the other NFS server since it had a real-time up-to-date copy of the other NFS partition containing our VMs. This post doesn’t cover the automatic fail-over of those resources.
Note: A previously built cluster which used LXC containers ran an OCFS2 filesystem on top of DRBD. At first glance, OCFS2 ran wonderfully, but then we started having weird problems with out of space errors even though there was plenty of inodes and actual space free. In short, with OCFS2, you need to make sure the applications you intend to run on OCFS2 are “cluster-aware” and use the proper API calls for kernel locks, writes, etc.
Setting up LVM with an underlying XFS filesystem was pretty simple. We’re going to use LVM on top of DRBD. Optionally, you can use DRBD on top of LVM.
pvcreate /dev/drbd/by-res/nfs-mirror

vgcreate nfs /dev/drbd/by-res/nfs-mirror

lvcreate -l 639980 --name 1 nfs
lvcreate -l 639980 --name 2 nfs

mkfs.xfs /dev/nfs/1
mkfs.xfs /dev/nfs/2
So far so good. After a quick reboot, we check our drbd status and find the following.
version: 8.4.5 (api:1/proto:86-101)
GIT-hash: 1d360bde0e095d495786eaeb2a1ac76888e4db96 build by mockbuild@Build64R6, 2014-08-17 19:26:04

 1: cs:Connected ro:Secondary/Secondary ds:Diskless/Diskless C r-----
    ns:0 nr:0 dw:0 dr:0 al:0 bm:0 lo:0 pe:0 ua:0 ap:0 ep:1 wo:b oos:0
Uh oh! It’s showing that the disk isn’t found. But I can see the LVM disk recognized and available. Attempting to force one of the nodes to become primary results in the following dmesg error.
block drbd1: State change failed: Need access to UpToDate data
block drbd1:   state = { cs:Connected ro:Secondary/Secondary ds:Diskless/Diskless r----- }
block drbd1:  wanted = { cs:Connected ro:Primary/Secondary ds:Diskless/Diskless r----- }
I remember having problems with LVM and DRBD so I quickly do a google search and find the Nested LVM configuration with DRBD. So we make the following change to the filter setting in our /etc/lvm/lvm.conf file.
filter = [ "a|sd.*|", "a|drbd.*|", "r|.*|" ]
The above is basically a regular expression that LVM uses to know what block devices to search through looking for file systems. Essentially it says to accept (a) all sd* (sda, sdb, sdc, etc.) devices as well as any drbd (drbd0, drbd1, etc.) device and then to ignore (r) everything else.
Another reboot and the problem persists. With no data on the devices, I decided to wipe the LVM configuration information.
dd if=/dev/zero of=/dev/drbd1 bs=1M count=1000
And then reboot.
CentOS: LVM & DRBD Incompatibility
Suddenly on reboot, I again see the filesystem doing a sync. DRBD is working again and shows the disk online.
version: 8.4.5 (api:1/proto:86-101)
GIT-hash: 1d360bde0e095d495786eaeb2a1ac76888e4db96 build by mockbuild@Build64R6, 2014-08-17 19:26:04

 1: cs:SyncTarget ro:Primary/Primary ds:Inconsistent/UpToDate C r-----
    ns:0 nr:2197564 dw:2196480 dr:604 al:0 bm:0 lo:2 pe:6 ua:1 ap:0 ep:1 wo:d oos:395996
        [===============>....] sync'ed: 84.9% (395996/2592476)K
        finish: 0:00:06 speed: 64,512 (62,756) want: 71,200 K/sec
OK. It’s working again! LVM must be incomptible with DRBD on CentOS?
No. Lets step back and think this through. We know that LVM scans the block devices looking for configured LVM filesystems to initialize. It scans our underlying DRBD device (/dev/sdb) and sees LVM partitions so it maps then. Then DRBD comes along and attempts to grab a handle to the underlying device only to find that someone else (LVM) was already there… Hence, the disk is unavailable since LVM has it locked.
That makes logical sense. Let’s see if our theory is correct:
[root@host ~]# ls /etc/rc.d/rc3.d/ -la
total 8
lrwxrwxrwx.  1 root root   22 Oct 21 12:47 S02lvm2-monitor -> ../init.d/lvm2-monitor
lrwxrwxrwx   1 root root   14 Oct 22 10:35 S70drbd -> ../init.d/drbd
Yes. LVM (021) scans and monitors before DRBD is initialized (70). So how do we fix it…
The Solution
One solution would be to start DRBD before the LVM file system is initialized, but that could cause other timing issues. And more specifically, a “yum update” could override our configuration. Instead, how about we go back into our /etc/lvm/lvm.conf file and see if we can fix the filter parameter.
Because our underlying drbd block device is /dev/sdb, how about if we explicitly exclude it from the list? The filter parameter works such that the first matching regular expression is the action (accept or reject). Once matched for a block device, the remaining parameters are ignored. So the correct filter would be:
filter = [ "r|sdb|", "a|sd.*|", "a|drbd.*|", "r|.*|"]
Essentially, the above filter explicitly excludes DRBD’s underlying block device (/dev/sdb), then looks for any SCSI hard disks, following by DRBD devices and then excludes everything else.
After a reboot of the nodes, and everything stays update and active.
SUCCESS! Now off to finish setting up the NFS storage space…
Good luck and hopefully this helped you solve a diskless/diskless DRBD problem that wasn’t due to network connectivity problems (or an actual failed disk).